Nerko Documentation
Everything you need to install, set up and customize your NFT portfolio or marketplace website, step by step and with screenshots.
Welcome to Nerko
Thank you for choosing Nerko! Nerko is an NFT portfolio and marketplace WordPress theme for Elementor, made for NFT collections, crypto projects, digital artists and NFT shops.
It comes with 5 one-page home demos, styled inner pages, 26 custom Elementor widgets, a template library of 48 ready blocks in English and Arabic, a header and footer builder, mega menus, a light and dark mode, a styled WooCommerce store and full RTL and Arabic support. Everything works with the free Elementor plugin, and every step in this guide uses the WordPress dashboard and the Elementor visual editor.
New to WordPress? Follow three sections in order: Install the Theme, Install Plugins and Import a Demo. Press / anytime to search this guide.
Features
A quick look at what's inside Nerko and the Nerko Core plugin.
5 One-Page Homes
NFT and crypto landing pages built with Elementor containers and native widgets.
Free Elementor
Every page, header and footer works with the free plugin. No Pro license needed.
26 Nerko Widgets
Menus, products, roadmap, team, FAQ, collection, cart, newsletter and more.
Template Library
48 ready blocks in English and Arabic RTL, previewed live and inserted in one click.
Header & Footer Builder
Design them in Elementor and choose where each one appears with display rules.
Mega Menus
Rich dropdowns built visually and attached to any top-level menu item.
Light & Dark Mode
A visitor toggle that remembers the choice, with no white flash on load.
Full RTL & Arabic
Mirrored right-to-left styles and Arabic translations for the theme and plugin.
Styled WooCommerce
Shop, product, cart, checkout and account pages with 3 product card styles.
Connect-Wallet Popup
A ready popup for your header button, with wallets you can add and reorder.
Motion Effects
Entrance and scroll animations, mouse and scroll parallax, custom CSS per element.
SEO & Speed
Meta tags, Open Graph and schema, local fonts, lazy images and minified files.
Requirements
Nerko runs on any good WordPress hosting. Check that your server meets these values. If you're not sure, send this table to your hosting company.
| Setting | Minimum | Recommended |
|---|---|---|
| WordPress | 6.0 | The latest version (tested up to 7.1) |
| PHP | 8.2 | 8.2 or newer |
| PHP memory limit | 128M | 256M or more |
| Max execution time | 10 seconds | 60 seconds or more |
| Max input vars | 1000 | 3000 |
| Free disk space | 100 MB | 300 MB or more |
| PHP extensions | XML (XMLReader, DOMDocument, SimpleXML) | Also GD or Imagick for images |
| Outgoing connections | Allowed (cURL with SSL) | Needed to install Nerko Core and download demo images |
You don't have to check these by hand. The Demo Import page tests your server and explains anything that needs fixing.
Raising PHP limits
Most hosts let you change these values in their control panel (look for "PHP settings" or "PHP options"). If yours doesn't, add these lines to the php.ini file, or ask your host to do it:
memory_limit = 256M
max_execution_time = 120
max_input_vars = 3000
To raise the memory WordPress itself may use, add this line to wp-config.php, just above the line /* That's all, stop editing! */:
define( 'WP_MEMORY_LIMIT', '256M' );WordPress won't activate Nerko on PHP older than 8.2. It shows "This theme doesn't work with your version of PHP". Ask your host to switch your site to PHP 8.2 or newer.
What You Download
| Where you bought | What to download |
|---|---|
| ThemeGenix | Open the download link from your purchase email (Lemon Squeezy). |
| ThemeForest | Go to Downloads in your Envato account. Installable WordPress file only gives you nerko.zip; All files & documentation gives you the full package. |
The one file you upload to WordPress is nerko.zip: the theme. Don't unzip it. If you downloaded the full package, unzip the package itself on your computer and use the nerko.zip inside.
You don't need to upload any plugin by hand. After you activate Nerko, WordPress installs Elementor, Nerko Core and the recommended plugins for you (see Install Plugins).
Uploading the whole package instead of nerko.zip gives the error "The package could not be installed. The theme is missing the style.css stylesheet." Upload only the theme file.
Live Demos
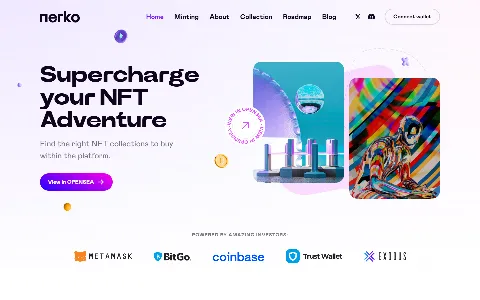
All 5 homes. Pick a version, then click a card to open the live demo.


Inner pages
The same pages exist in the Arabic demo under /rtl/, for example https://nerko.themegenix.com/rtl/shop/.
Add ?schema=dark or ?schema=light to any demo link to open it in that mode. The demo remembers the choice, so other pages you open stay in the same mode.
Install the Theme
There are two ways. The dashboard way is the easiest and works on almost every host.
From the WordPress dashboard
- Open the theme uploaderGo to Appearance › Themes, click Add Theme, then Upload Theme at the top.
- Upload nerko.zipClick Choose File, select
nerko.zipand click Install Now. - ActivateWhen you see "Theme installed successfully.", click Activate.
- Continue with the pluginsWordPress opens Appearance › Install Plugins (or the Nerko Core dashboard if Nerko Core is already active). Go on to Install Plugins.
With FTP (if the upload fails)
- Unzip
nerko.zipon your computer. You get a folder namednerko. - Connect to your site with an FTP program (for example FileZilla) or your host's File Manager.
- Upload the
nerkofolder intowp-content/themes/. - Go to Appearance › Themes and click Activate on Nerko.
If the upload says "The uploaded file exceeds the upload_max_filesize directive in php.ini", your host's upload limit is too small. Use FTP, or ask your host to raise upload_max_filesize.
Install Plugins
Nerko needs two plugins and recommends three more. They're all free and install in one go. After you activate the theme, a notice at the top of the dashboard lists them.
| Plugin | Type | What it does |
|---|---|---|
| Elementor Page Builder | Required | The free visual builder you design your pages, headers and footers with. |
| Nerko Core | Required | Nerko's widgets, demo import, header & footer builder, mega menus, 404 builder, template library, post types and theme options. |
| WooCommerce | Recommended | The shop, product, cart, checkout and account pages. |
| Contact Form 7 | Recommended | The contact and newsletter forms. |
| WP Classic Editor | Recommended | Keeps WordPress's classic editor for posts, as in the demo. |
- Open the installerClick Begin installing plugins in the notice, or go to Appearance › Install Plugins.
- Install allTick the checkbox in the table header to select every plugin, choose Install under Bulk actions and click Apply.
- Wait for the messageWhen it says "All installations have been completed.", go back to the installer.
- Activate allSelect all plugins again, choose Activate under Bulk actions and click Apply.
Install all five. The demo import needs every plugin in the list to be active, not only the two required ones. You can also install and activate them on the Demo Import page with one button.
Nerko Core is downloaded from the ThemeGenix server during the install. If it fails, ask your host to allow outgoing connections, then try again.
Import a Demo
The demo import adds the demo pages, products, images, menus, headers, footers and settings to your site, so it looks like the live demo. Go to Nerko Core › Demo Import.
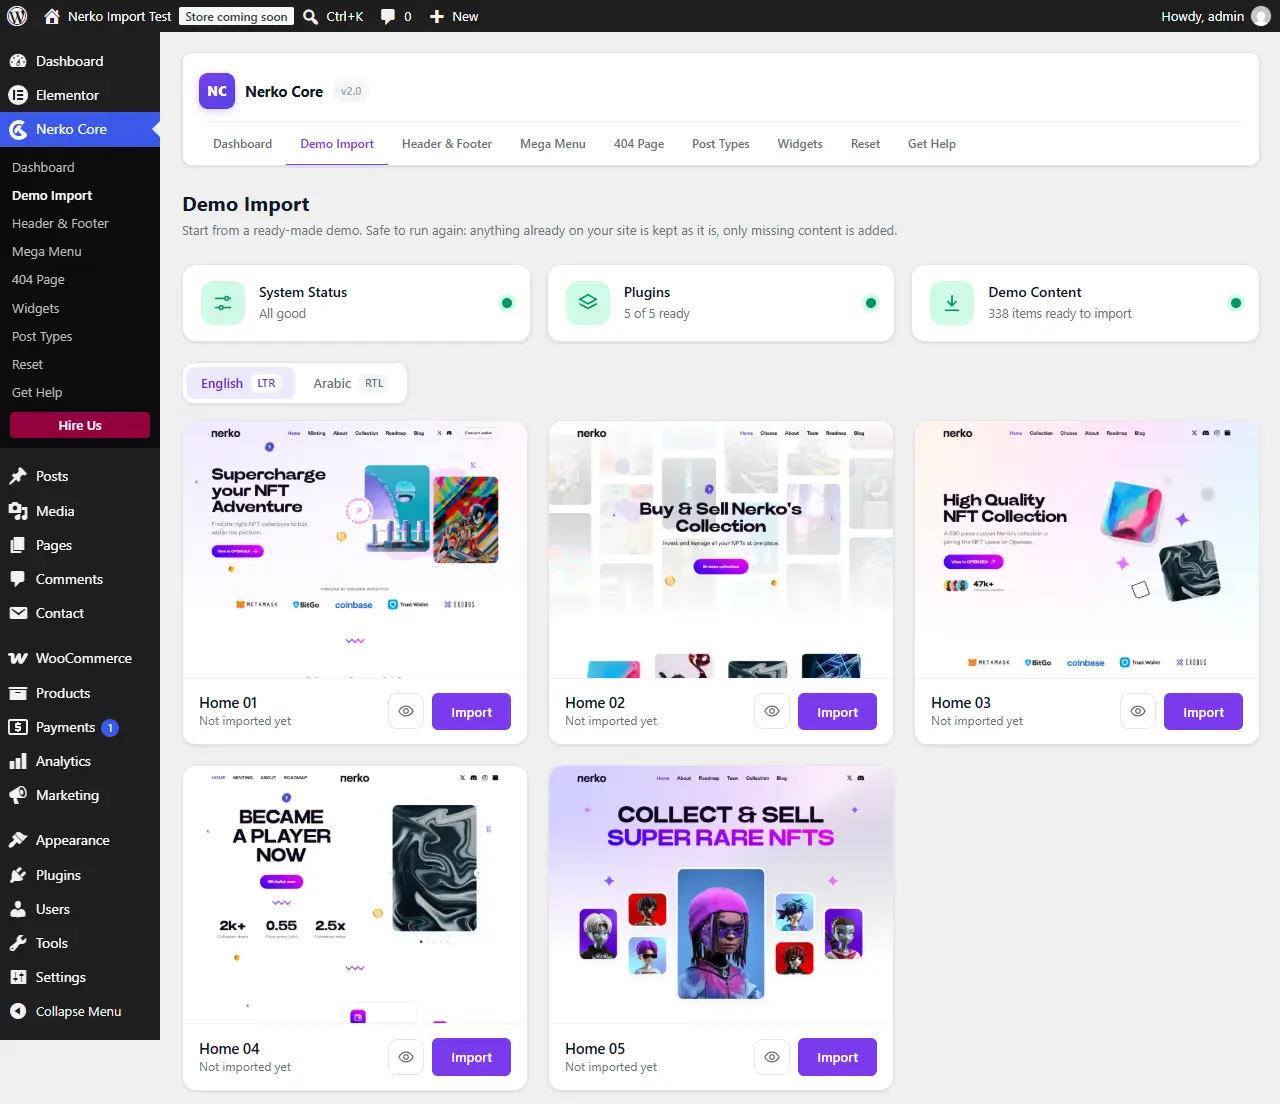
1. Check the three tiles
The tiles at the top tell you if your site is ready. Click a tile to see the details.
- System Status tests your server. Green is fine, yellow works but is worth fixing, red stops the import. Each row says how to fix it; then click Check Again.
- Plugins lists the five plugins. They must all be active. If one is missing, click Install & Activate All.
- Demo Content compares the demo with your site and shows how many items will be added.
The demo images come from the live demo while you import, so your server must be able to make outgoing connections. System Status tests this as Image download.
2. Choose the language
Every home comes in two versions. The switch above the demos picks one: English (left to right) or Arabic (right to left, with Arabic text).
- The page opens on the language of your site, set in Settings › General › Site Language. On an Arabic site, Arabic is selected for you.
- For the Arabic demo, set your site language to Arabic first (see RTL & Arabic). If your site is still in English, the import window reminds you.
- The eye icon on each card opens that home on the live demo, in the language you picked.
3. Import
- Pick a demoClick Import on the home you like. The eye icon opens its live preview.
- Choose what to bring inContent (pages, posts, products, images, menus and forms) is always included. Keep Widgets and Theme settings ticked. Tick Use Home 0X as the front page to make this home your homepage.
- Start the importClick Start Import and keep the tab open. You can keep working in another tab.
- DoneWhen you see "Your demo is ready", click View Your Site.
What the import does
- Adds the demo pages, posts, headers, footers, menus and forms, and downloads the demo images into your Media Library.
- Sets up the shop: products with their variations, attributes and reviews, and the Shop, Cart, Checkout and My account pages. WooCommerce's own untouched pages make way for the demo's, and the demo's product image shape and shop settings are used where you still have WooCommerce's defaults.
- Fills empty menu locations and the sidebar widgets. WordPress's own sample widgets are moved to Inactive first.
- Brings in the demo's Customizer settings that you haven't changed yet, and the demo's Elementor colors, fonts and settings.
- Sets your homepage (if you ticked it) and the blog page, if they aren't set yet.
- Turns on pretty links (
/sample-page/) on the first import if your site still uses plain links. - Removes WordPress's untouched sample content: the "Hello world!" post, the Sample Page, the draft Privacy Policy and Contact Form 7's "Contact form 1".
Safe to run again
Nothing on your site is replaced or duplicated. Your own pages, menus and settings stay as they are, and running the import again only adds what is missing. If the import stops halfway, your progress is saved: click Continue Import, or open the page later and continue from the banner.
Use one language per site. If you already imported the English demo, start from a fresh site for the Arabic one, and the other way round. A Full reset gives you a fresh site.
Child Theme
You only need a child theme if you plan to edit the theme's PHP or CSS files. Colors, fonts, headers, footers and pages are all changed in WordPress and survive updates without one. Small CSS changes can go in Appearance › Customize › Additional CSS.
To make one, create a folder nerko-child in wp-content/themes/ with these two files, then activate "Nerko Child" in Appearance › Themes. Keep Nerko installed: the child theme needs it.
/*
Theme Name: Nerko Child
Template: nerko
Version: 1.0
*/<?php
add_action( 'wp_enqueue_scripts', function () {
wp_enqueue_style( 'nerko-child', get_stylesheet_uri(), [], '1.0' );
}, 20 );WordPress stores Customizer settings per theme. Activate the child theme before you import a demo, so the demo's settings are saved for the child theme.
Nerko Core Menu
Nerko Core adds its own menu to the dashboard, right below Elementor. The tabs at the top of each page lead to every tool.
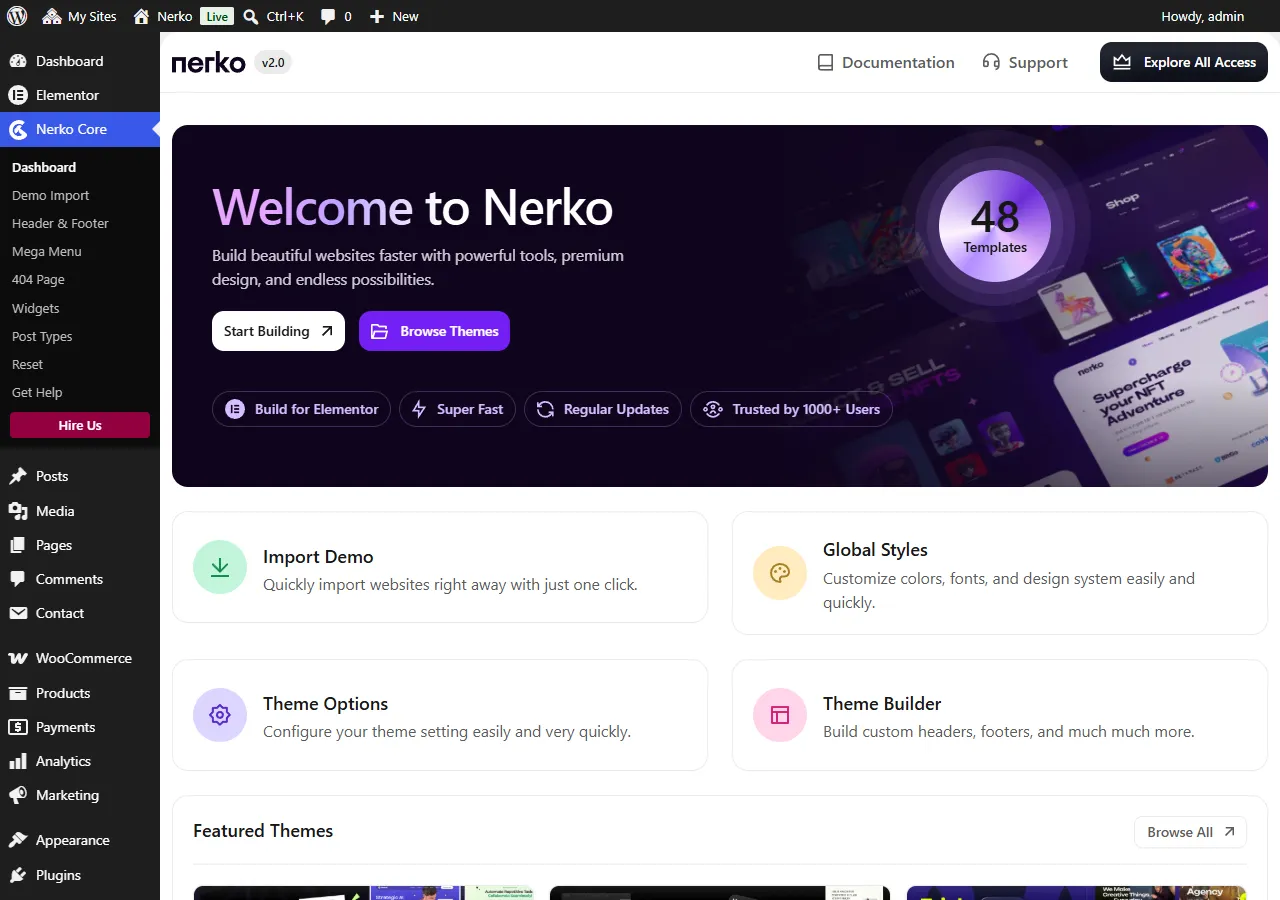
| Menu item | What it's for |
|---|---|
| Dashboard | Shortcuts to the demo import, Customizer and theme builder. |
| Demo Import | Import a demo. See Import a Demo. |
| Header & Footer | Build headers and footers in Elementor. See Header & Footer. |
| Mega Menu | Design mega menus. See Mega Menu. |
| 404 Page | Choose the theme's 404 page or design your own. See 404 Page. |
| Widgets | Turn Nerko widgets on or off. See Turn widgets on or off. |
| Post Types | Create your own content types. See Post Types & Fields. |
| Reset | Delete the parts you choose, or reset the whole site. See Reset the Site. |
| Get Help | Links to documentation, video tutorials and support. |
The theme options are in the Customizer: Appearance › Customize › Nerko Customizer (see Theme Options).
Homepage & Blog Page
Each home is a normal WordPress page (Home One to Home Five). To change which one is your homepage, go to Settings › Reading, choose A static page, pick the Homepage and the Posts page (Blog), and click Save Changes.
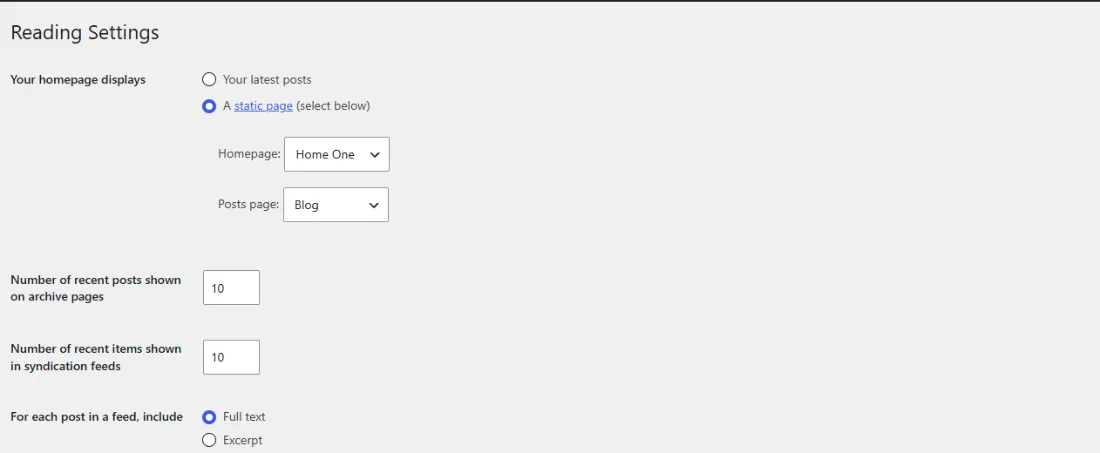
Each home has its own header, chosen with display rules. If you switch homepages, also check which header shows on the front page in Header & Footer.
Logo & Site Icon
Logo in an Elementor header
Open the header in Nerko Core › Header & Footer and click Edit with Elementor. Click the logo: the Logo widget has Logo (Light Mode), Logo (Dark Mode) and an optional Sticky Logo, so the right logo shows in each mode. The size is under Style.
Logo in the theme's own header and footer
Pages without an Elementor header use the theme header. Set its logos in Appearance › Customize › Nerko Customizer › Header Setting: Logo (Light Mode) (a dark logo for the light background), Logo (Dark Mode) (a white logo for the dark background) and Logo Width. The footer logo is in Footer Settings.
Site icon (favicon)
Go to Appearance › Customize › Site Identity and choose a Site Icon, at least 512 × 512 pixels.
Theme Options
Go to Appearance › Customize › Nerko Customizer. Changes show live in the preview; click Publish to save.
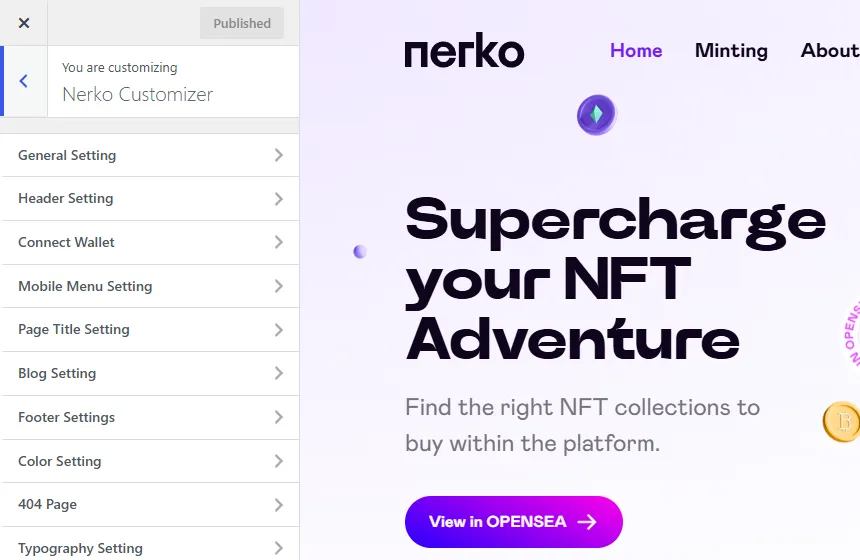
| Section | What you can change |
|---|---|
| General Setting | Default Color Mode, the Light / Dark Switcher, Background Glow and the Preloader. |
| Header Setting | The theme header: Sticky Header, logos, Logo Width, social links and the Connect Wallet Button with its text. |
| Connect Wallet | The wallet popup. See Connect Wallet Popup. |
| Mobile Menu Setting | Social links in the theme's mobile menu. |
| Page Title Setting | The page title area. See Page Title & Breadcrumb. |
| Blog Setting | Post meta, share buttons and the blog page title. See Blog. |
| Footer Settings | The theme footer: logo, text, social links and Copyright Text ({year} shows the current year). |
| Color Setting | With Elementor active, colors are managed in Elementor. See Colors & Fonts. |
| 404 Page | Big Text, Not Found Title and Button Text of the theme's 404 page. |
| Typography Setting | Heading sizes H1 to H6. Fonts are managed in Elementor. |
The header and footer settings apply to the theme's own header and footer. Pages that use an Elementor header or footer from Header & Footer are changed in Elementor instead.
Colors & Fonts
Nerko's colors and fonts come from Elementor's Site Settings, so you change them once and the whole site follows: Elementor pages, headers, footers, blog, shop and the theme's own pages. In the Customizer, the Color and Typography sections show a note with an Open Site Settings button.
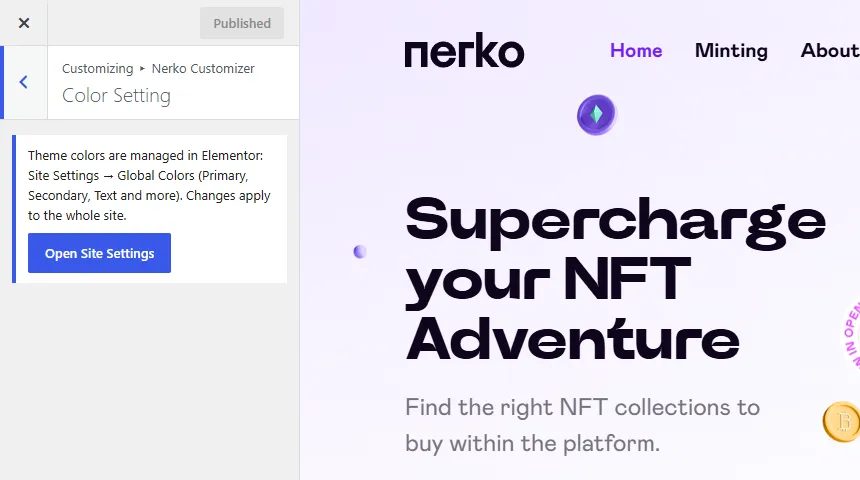
To open Site Settings yourself, edit any page with Elementor, click the Elementor menu at the top left and choose Site Settings.
Global colors
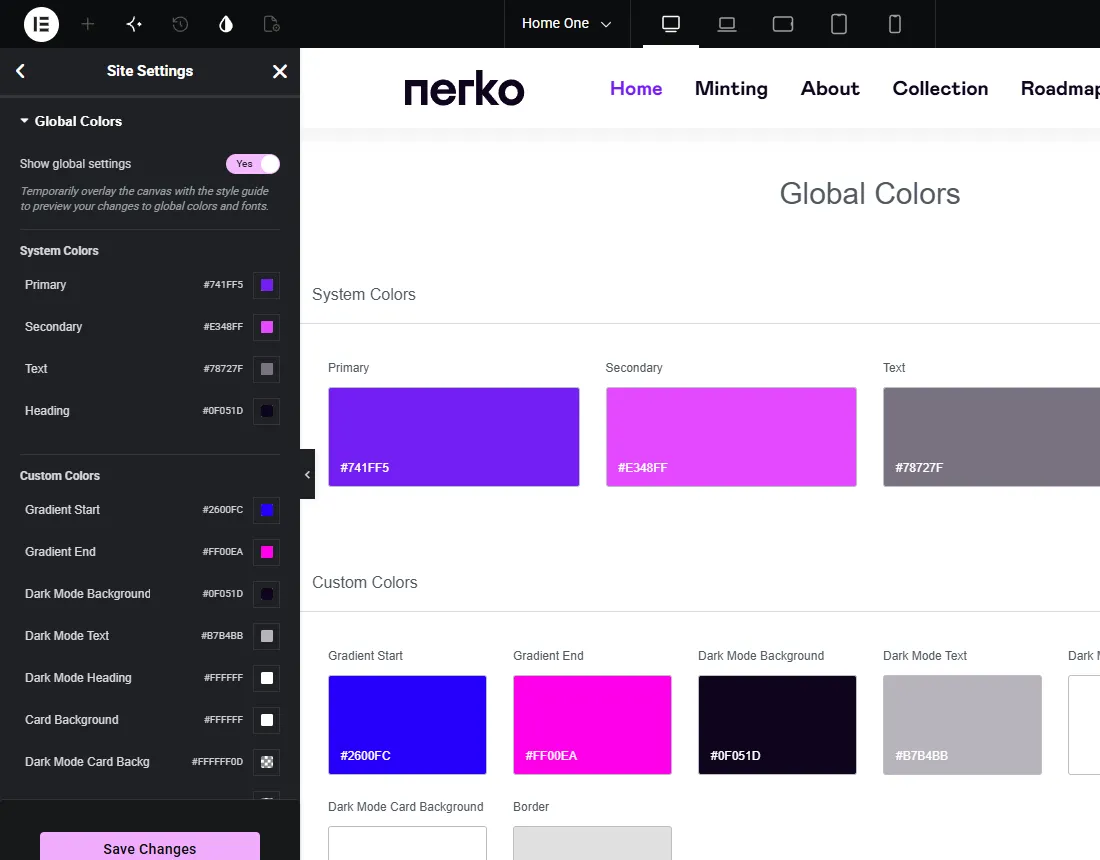
| Color | Default | Used for |
|---|---|---|
| Primary | #741FF5 | Links, buttons and accents, in both modes. |
| Secondary | #E348FF | Second accent and hover states, in both modes. |
| Text | #78727F | Body text in light mode. |
| Heading | #0F051D | Headings in light mode. |
| Gradient Start / End | #2600FC / #FF00EA | The brand gradient on buttons, text highlights and shapes. |
| Dark Mode Text / Heading | #B7B4BB / #FFFFFF | Body text and headings in dark mode. |
| Dark Mode Background | #0F051D | The dark mode background color. |
| Card Background, Border | White, light gray | Cards and borders, with their own dark mode values. |
Global fonts
In Site Settings › Global Fonts, Heading uses Power Grotesk and Body, Sub Title and Button use Mabry Pro. Custom presets such as Hero Title, Section Title, Big Number and Lead Text keep the demo's sizes. Change a family and every heading or text that uses it follows.
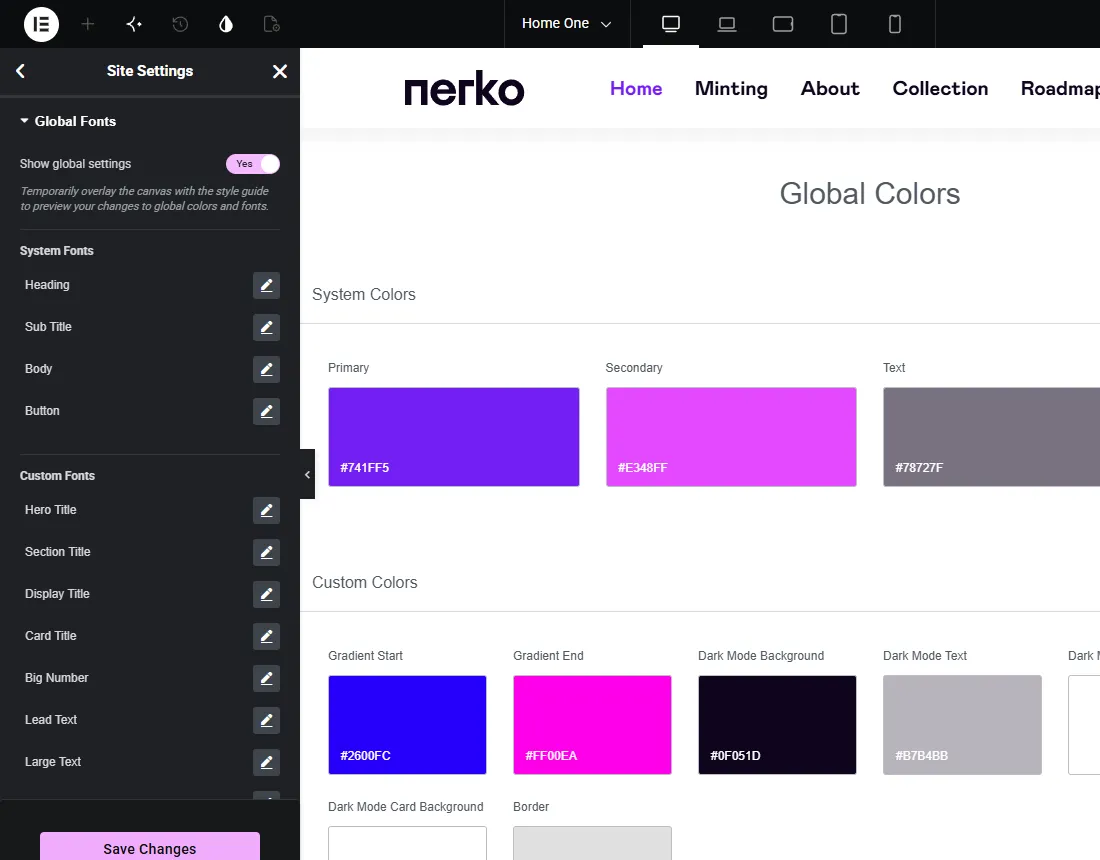
Power Grotesk and Mabry Pro are served from the theme's own files. When you pick another family, Elementor loads it and the theme stops loading its font file, so there is no extra download.
Light & Dark Mode
Every Nerko page has a light and a dark version. Set them up in Nerko Customizer › General Setting:
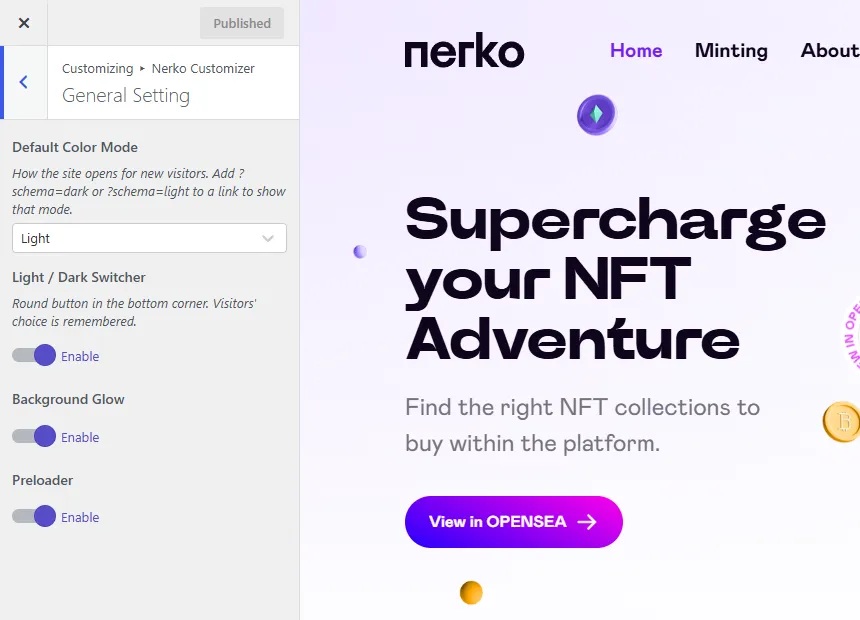
- Default Color Mode: how the site opens for new visitors, Light or Dark.
- Light / Dark Switcher: the round button in the bottom corner (bottom left on RTL sites). Visitors' choice is remembered in their browser, and pages load straight in that mode with no white flash.
- Background Glow: the soft gradient glows behind the page.
Link to a mode
Add ?schema=dark or ?schema=light to any link to open the page in that mode, for example https://your-site.com/?schema=dark. The choice is remembered for the visitor's next pages.
Show something in one mode only
In Elementor, select an element and open Advanced › Responsive. Color Mode lets you show it in both modes, light mode only or dark mode only, for example a different image for each mode.
Header & Footer
Build headers and footers with Elementor and choose where each one appears. Go to Nerko Core › Header & Footer. The cards at the top show what the site uses now: Site Header, Before Footer and Site Footer.
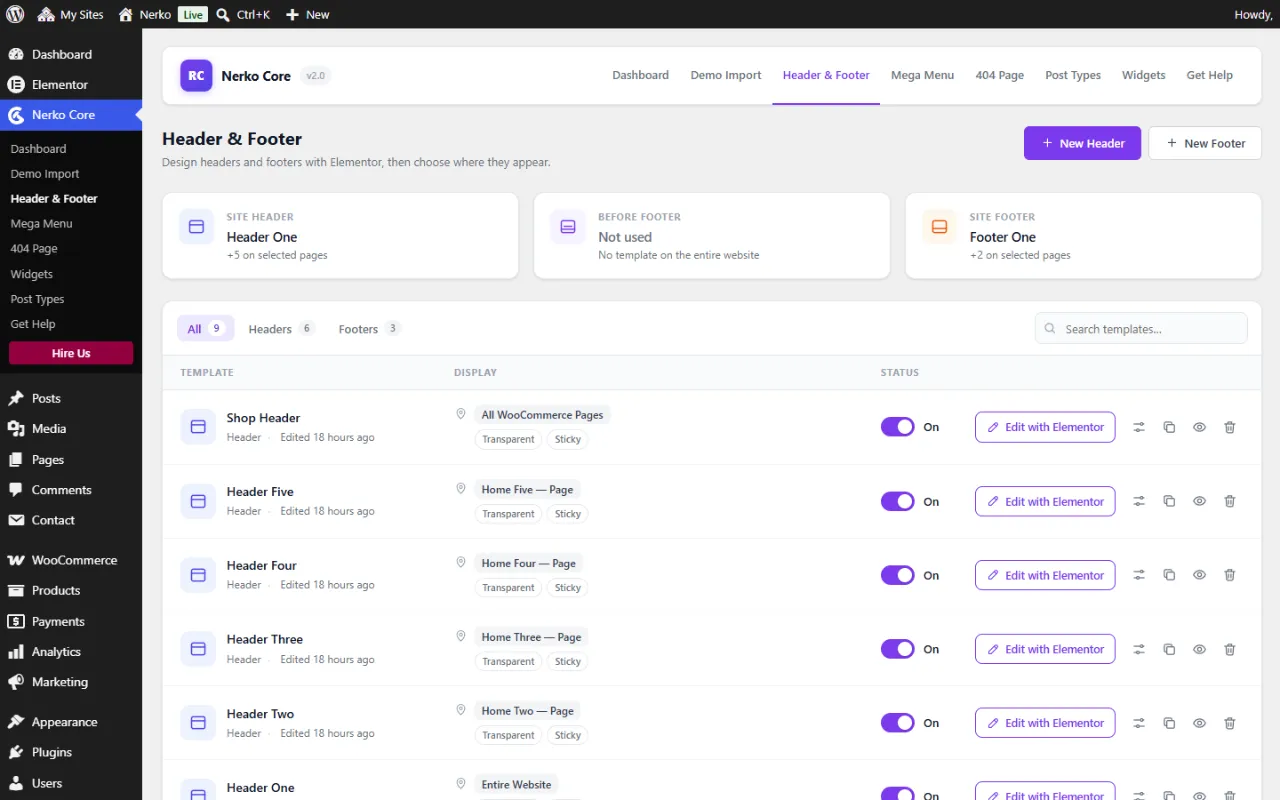
Create a header or footer
- Click New Header or New Footer, give it a name and choose the Template Type.
- Set the display rules in Template Settings (below) and save.
- Click Edit with Elementor and design it with containers and widgets such as Logo, Nav Menu, Nerko Button, Social List, Cart and Copyright.
| Template type | Where it shows |
|---|---|
| Header | Replaces the site header. |
| Footer | Replaces the site footer. |
| Before Footer | Shows above the footer, for example a call to action. |
| Custom Block | Anywhere you paste its shortcode, like [nerkocore_template id="123"]. |
Display rules

- Status: switch a template off without deleting it.
- Display On: Entire Website, All Singulars, All Archives, special pages (Front Page, Blog / Posts Page, 404 Page, Search Results, Date and Author Archive, WooCommerce Shop, All WooCommerce Pages), all items of a post type, or Specific Pages / Posts / Terms.
- Do Not Display On: exclusions, with the same choices.
- Users: All Users, Logged In or Logged Out Users, or chosen user roles.
When several templates match a page, the most specific rule wins (a specific page beats the front page, which beats All Pages, which beats Entire Website). If two rules are equal, the newer template wins, and the list warns you about the overlap.
A different header on each page
This is how the demo works: Header One is set to Entire Website, Header Two to Header Five each target Specific Pages (their own home), and the Shop Header targets All WooCommerce Pages. Add a header with a specific page rule and it takes over on that page only.
Example: no footer on the 404 page
Open the footer's settings, click Add Exclusion Rule under Do Not Display On and choose 404 Page. The demo's Footer One does exactly this.
Header behaviour
Headers also have Transparent Header (floats over the first section), Side Header (a fixed side column on wide screens) and Sticky Header with Sticky On (Desktop, Tablet, Mobile), a Background color and Hide on Scroll Down. In Elementor, the header container has a Sticky Header section to change its padding while stuck, and the Logo widget can show a Sticky Logo.
Mega Menu
A mega menu is a dropdown you design in Elementor, with columns of links, images or buttons. Go to Nerko Core › Mega Menu.
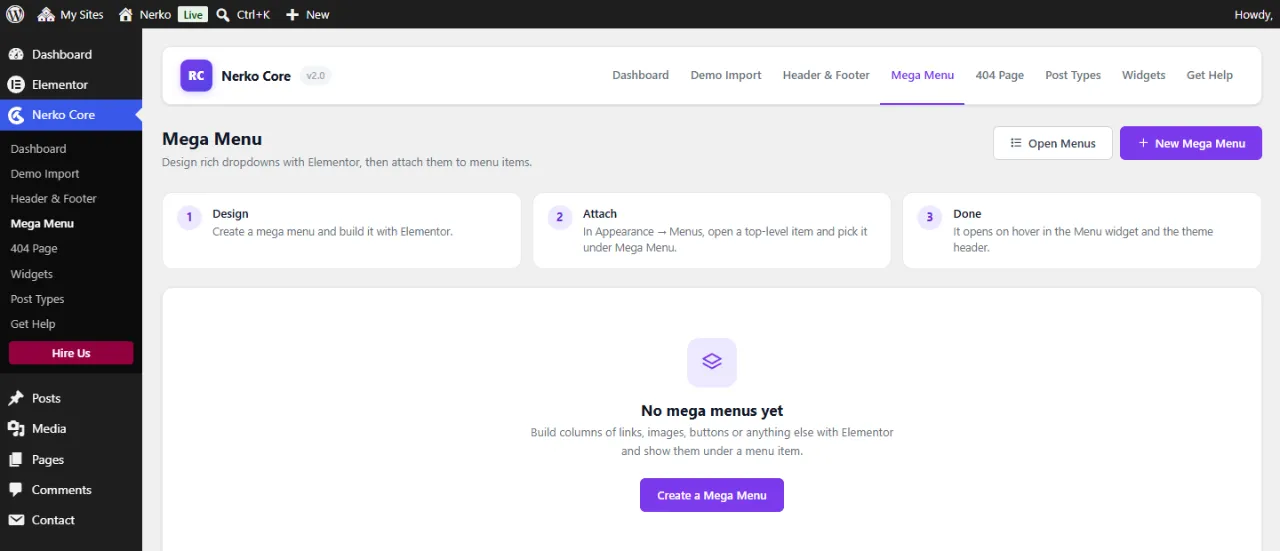
- DesignClick New Mega Menu and build it with Elementor.
- AttachIn Appearance › Menus, open a top-level menu item. In the Nerko Core box, turn on Show a mega menu and pick it under Mega Menu.
- Fine-tuneChoose Open On (Hover or Click) and the Width: Header container, Full width or Custom (with Width and Position).

Any menu item can also get an Icon and a Badge (a short label such as "New", with its own color).
Page Title & Breadcrumb
The page title area is the banner with the page title on the blog, archives, search results, the shop and normal pages.
For the whole site
In Nerko Customizer › Page Title Setting: Page Title Area (on or off), Background Image and Title Size. A Breadcrumb Links switch appears there if the free Breadcrumb NavXT plugin is active. WooCommerce pages show the shop breadcrumb under the title.
For one page or post
Edit the page and find the Breadcrumb Settings box: hide the whole title area with Breadcrumb: Hidden, hide only the Background Image, or set a Custom Background Image. The demo homes hide it, because their first section is the hero.
Blog
- Blog page: set it in Settings › Reading. Its title comes from Nerko Customizer › Blog Setting › Blog Page Title.
- Sidebar: add widgets to the Blog Sidebar in Appearance › Widgets. The sidebar column only shows when it has widgets.
- Post meta: turn the author, date, category and comment count on or off in Blog Setting.
- Share buttons: Facebook, X, LinkedIn and Pinterest. Turn on Share Buttons in Blog Setting; they show on posts that have tags.
- Post formats: Nerko supports the image, audio, video, gallery and quote formats. Choose one in the post's Format box.
- Author box: appears under a post when the author has a Biographical Info in Users › Profile, with social links from the Author Info fields.
- Comments: threaded comments with a styled form.
To show posts on any Elementor page, use the Post Type widget.
404 Page
Go to Nerko Core › 404 Page. You have two choices:
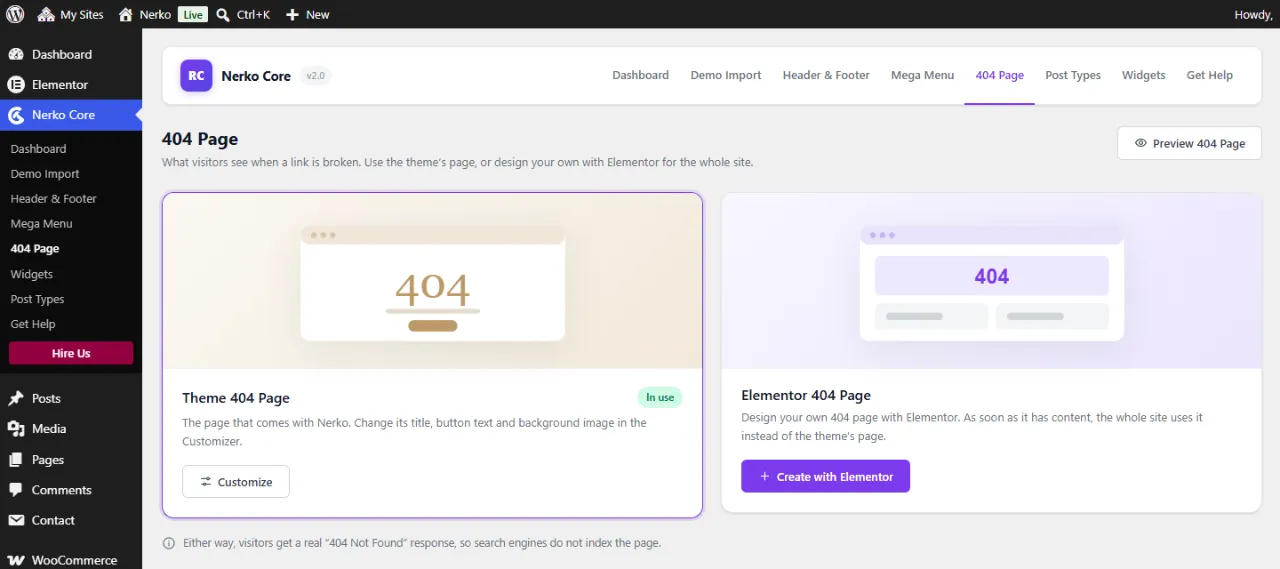
- Theme 404 Page: the built-in page. Click Customize to change its Big Text, Not Found Title and Button Text.
- Elementor 404 Page: click Create with Elementor and design your own. Turn on Use on the whole site, choose the Layout (With header & footer, or Full page) and check it with Preview 404 Page.
Either way, visitors get a real "404 Not Found" response, so search engines don't index the page.
Post Types & Fields
Need content like artists, drops or case studies? Create your own post type in Nerko Core › Post Types and click Add Post Type.
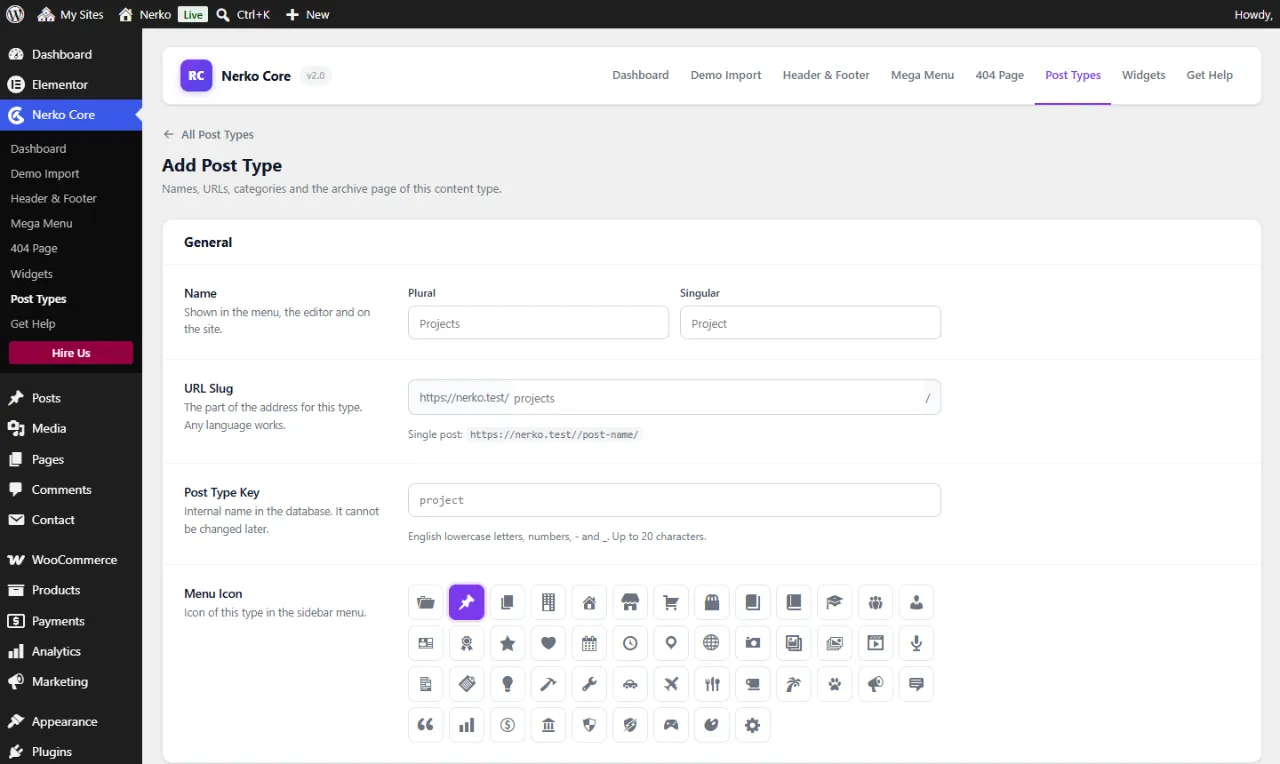
- General: Name (plural and singular), URL Slug, Post Type Key (can't be changed later) and Menu Icon.
- Taxonomies: categories and tags, or your own taxonomies.
- Archive Page: pick an Elementor page with the Post Type widget, or let Nerko Core create one, and set Posts Per Page.
- Single Post: ready Fields such as the Team member set (role, email, phone, social links, signature).
- Multilingual: make the post type Translatable with WPML or Polylang.
Each post type gets its own menu in the dashboard, and every post has a Duplicate link.
Contact Forms
Forms use Contact Form 7. Create and edit them in Contact › Contact Forms, including where the emails go (the Mail tab).
- Contact Form widget: pick a form under Form and style the fields, labels, button and messages in the Style tab. To put two fields side by side, wrap them in a row:
<div class="nerko-cf7-row">
  [text* your-name placeholder "Your name"]
  [email* your-email placeholder "Your email"]
</div>
[textarea your-message placeholder "Message"]
[submit "Send Message"]- Newsletter Form widget: use a Contact Form 7 form (wrapped in
<div class="newsletter__form">), or choose Form Address (Mailchimp…) and paste your list's form address. Email Field Name isEMAILfor Mailchimp.
Nerko loads Contact Form 7's files only on pages that have a form, so other pages stay fast.
Connect Wallet Popup
The "Connect wallet" button opens a popup with a list of wallets. Edit it in Nerko Customizer › Connect Wallet; the popup opens in the preview while you work.
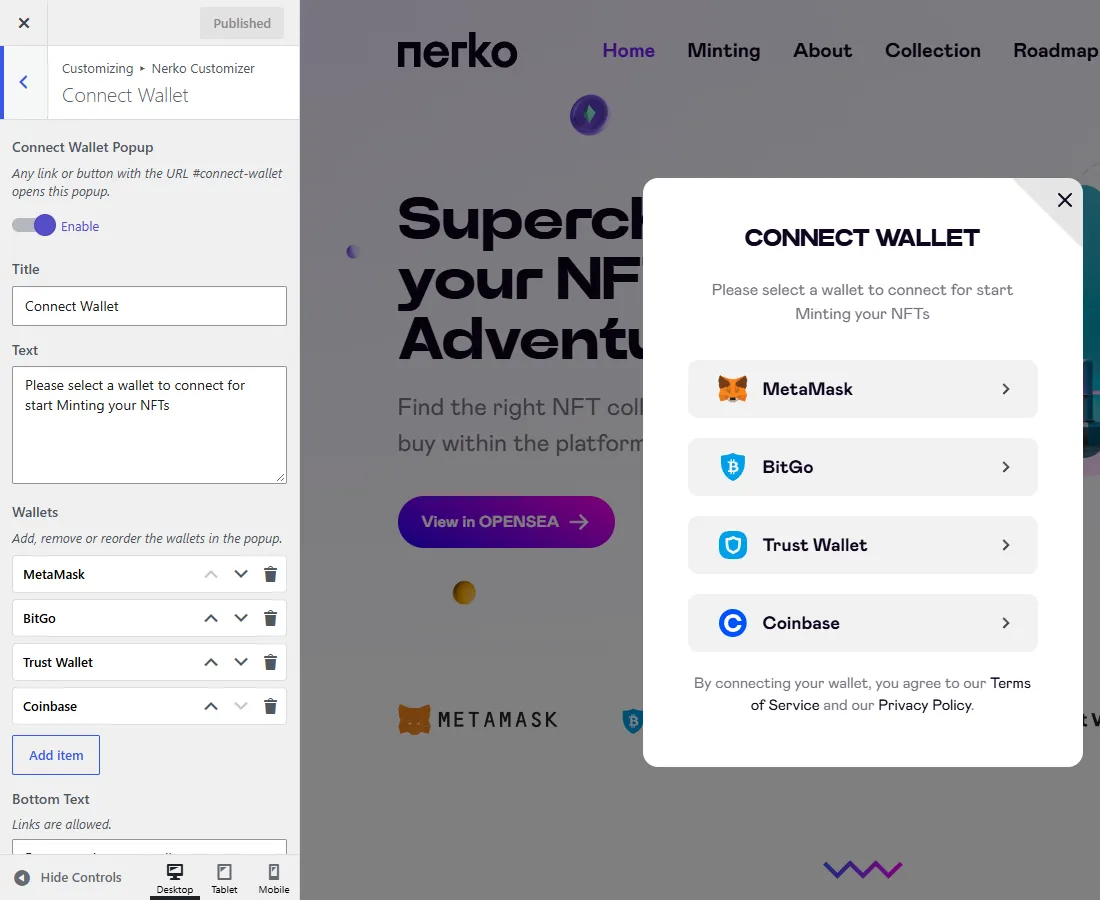
- Connect Wallet Popup: turn the popup on or off.
- Title and Text: the heading and intro.
- Wallets: add, remove or reorder wallets, each with a Name, Icon and Link.
- Bottom Text: the small print, links allowed.
To open it from any button: set the button's link to #connect-wallet. In the theme header, the button is set in Header Setting › Connect Wallet Button.
Each wallet is a link to the page you choose. Nerko doesn't connect to wallets or blockchains itself, so add a web3 plugin or service if you need a real wallet connection.
Sidebar Widgets
Go to Appearance › Widgets. Nerko has two widget areas:
- Blog Sidebar: next to blog posts and archives.
- Shop Sidebar: filters and widgets on the shop and product category pages (WooCommerce only).
Besides WordPress's own widgets, Nerko Core adds Nerko Sidebar Posts, Nerko CTA Widget and Nerko Info. Footers are built in Elementor (see Header & Footer).
Editing Pages
Every Nerko page, header and footer is built with Elementor containers and widgets, so you edit everything visually.
- Go to Pages, hover a page and click Edit with Elementor.
- Click any text, image or button to edit it in the left panel: Content, Style and Advanced tabs.
- Drag widgets from the panel into the page. Nerko's widgets are in the Nerko Addons category and carry a small Nerko badge.
- Use the device icons at the top to check tablet and mobile, then click Publish or Update.
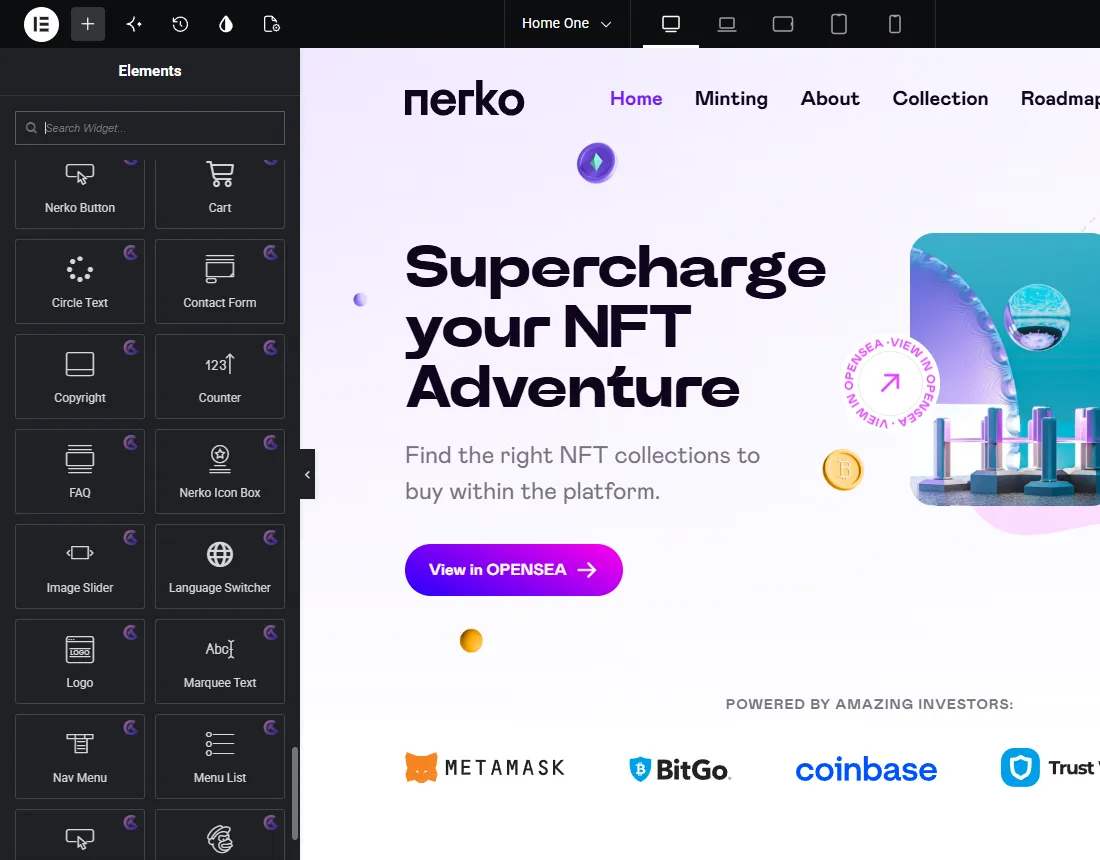
Headings in Nerko can have a gradient or colored part: select a Heading widget and open Style › Highlight Text.
Nerko Widgets
Nerko Core adds 26 widgets, each with content and style options.
| Widget | What it's for |
|---|---|
| Nav Menu | Header menus with mega menus, one-page links and mobile panels. |
| Logo | Light, dark and sticky logos. |
| Nerko Button | Gradient, outline and link buttons with a smooth hover. |
| Button | A second button style with a text roll on hover (also titled "Nerko Button" in the panel). |
| Cart | Cart icon with count and a side mini cart (WooCommerce). |
| Products | WooCommerce products as a grid or carousel, in the three card styles. |
| NFT Collection | A collection grid of artworks. |
| Roadmap | Project roadmap with phases. |
| Team | Team members with roles and social links. |
| FAQ | Accordion questions and answers. |
| Nerko Icon Box | Icon, title and text boxes with gradient icons. |
| Counter | Animated numbers. |
| Circle Text | Text set on a circle, like the "View in OpenSea" badge. |
| Image Slider | Sliding images. |
| Newsletter Form | Email signup with Contact Form 7 or a Mailchimp form address. |
| Contact Form | Styles a Contact Form 7 form. |
| Marquee Text | A scrolling band of text. |
| Video Popup | A play button that opens a video. |
| Off Canvas | A slide-in side panel. |
| Social List | Social icons. |
| Language Switcher | Languages from WPML or Polylang. |
| Copyright | The copyright line; {year} and {name} fill in the year and site name. |
| Post Type | Posts of any post type, for blog sections and archive pages. |
| Menu List | A list of links with icons, for example in footers. |
| Section Divider | A decorative divider between sections. |
| Search | Search form. Hidden from the panel and kept for older pages. |
Turn widgets on or off
Go to Nerko Core › Widgets. Switch off the widgets you don't use: they disappear from the panel and their CSS and JavaScript stop loading. Activate All and Deactivate All work on every widget at once.
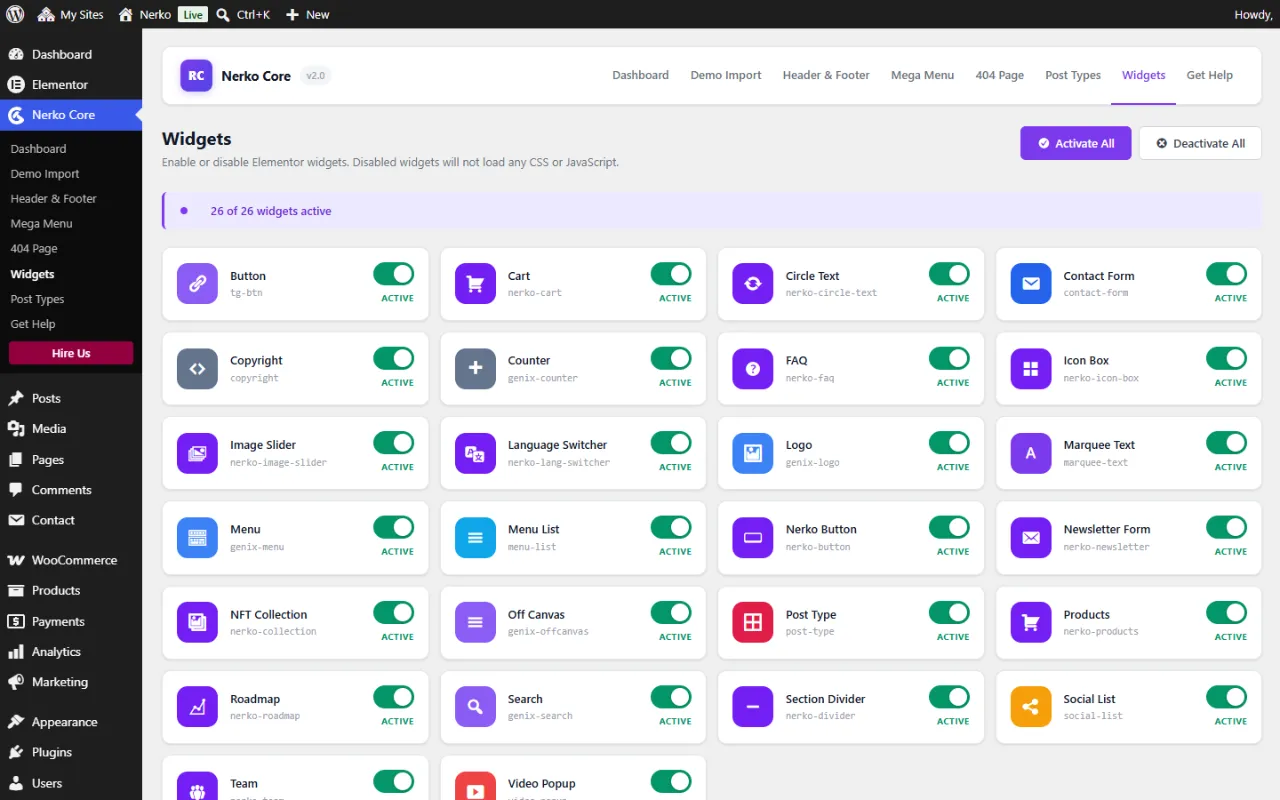
Extra Controls
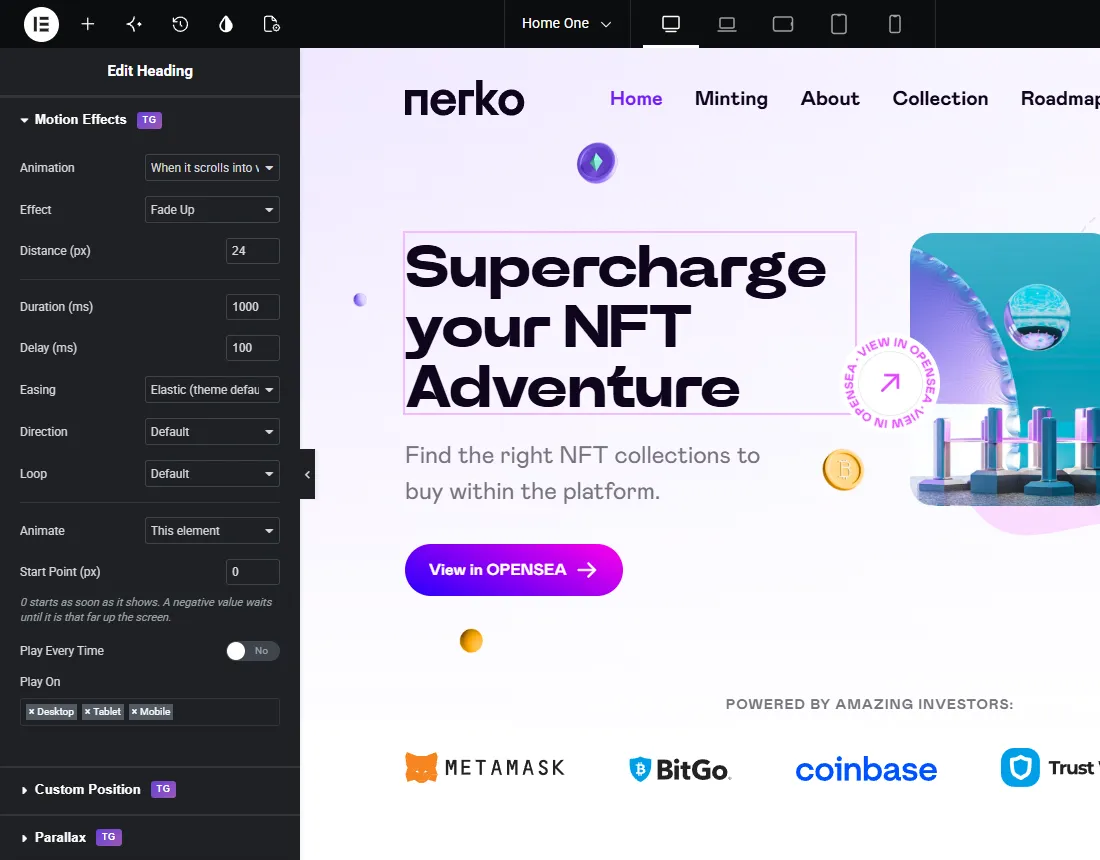
Nerko Core adds these sections to the Advanced tab of every container and widget. They're marked with a small TG badge.
| Section | What it does |
|---|---|
| Motion Effects | Animate an element when it scrolls into view, on page load, or while the page scrolls: fades, zoom, float, spin or custom values, with duration, delay, easing and stagger for child items. Right-click an element to copy and paste its motion. |
| Parallax | Mouse parallax (a wrapper and moving layers with a depth) or elements that move while scrolling. |
| Jarallax Background | Parallax background images or videos: scroll, zoom, fade and combinations. |
| Custom Position | Relative, absolute, fixed or sticky position with offsets per device. |
| Custom CSS | CSS for this element only, previewed live. |
In Custom CSS, {{WRAPPER}} stands for the element:
{{WRAPPER}} img {
	border-radius: 24px;
}
Motion Effects respect the visitor's "reduce motion" setting. Use Play On to limit an animation to some devices.
Template Library
Add ready sections from the demos to any page. In the Elementor editor, click the Nerko icon (Nerko Templates) next to Elementor's add-section buttons.
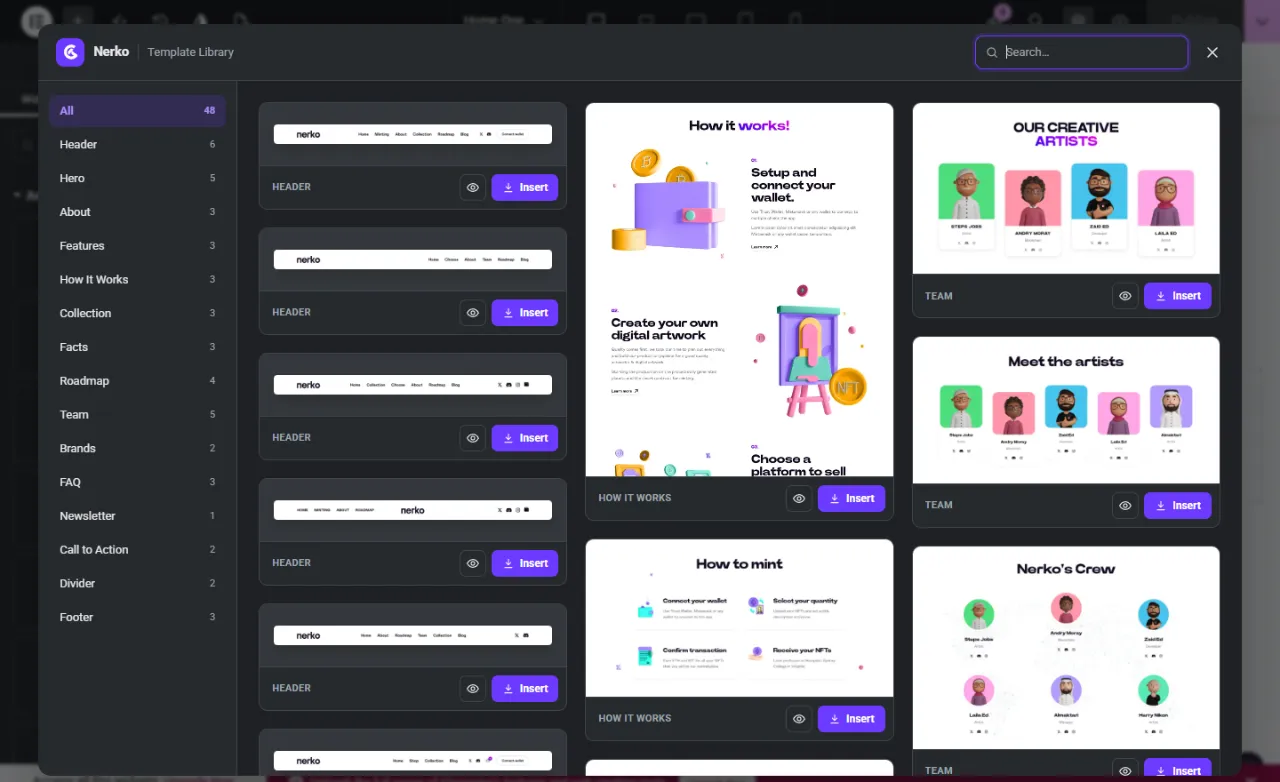
- Find a blockBrowse the categories or use the search box.
- PreviewClick the eye icon to see a live preview on desktop, tablet and mobile.
- InsertClick Insert. The block is added to your page, and its images are copied into your Media Library once and reused.
The library has 48 blocks in 15 categories: Header (6), Hero (5), About (3), Features (3), How It Works (3), Collection (3), Facts (3), Roadmap (4), Team (5), Brands (2), FAQ (3), Newsletter (1), Call to Action (2), Divider (2) and Footer (3). On a right-to-left site, the library shows the Arabic RTL version of the same blocks.
Shop Setup
Install and activate WooCommerce (see Install Plugins), then set up your store in WooCommerce › Settings: address, currency, payments and shipping. Nerko styles the shop, product, cart, checkout and account pages in light, dark and RTL, with no template files to maintain.
- Simple, variable, grouped and external products all work, with sale and "Sold out" badges.
- Product pages have an image gallery with a lightbox, quantity buttons, and related products that turn into a carousel when there are more than four.
- The shop pages use the Shop Header from Header & Footer (rule: All WooCommerce Pages) with a cart icon.
- WooCommerce's styles and scripts load only on shop pages and pages with shop blocks, so the rest of the site stays fast.
Product Cards
Choose the card style in Appearance › Customize › WooCommerce › Product Catalog › Product Card Style: Boxed, Gradient Glow or Overlay. It applies to the shop, category pages, related products and up-sells.
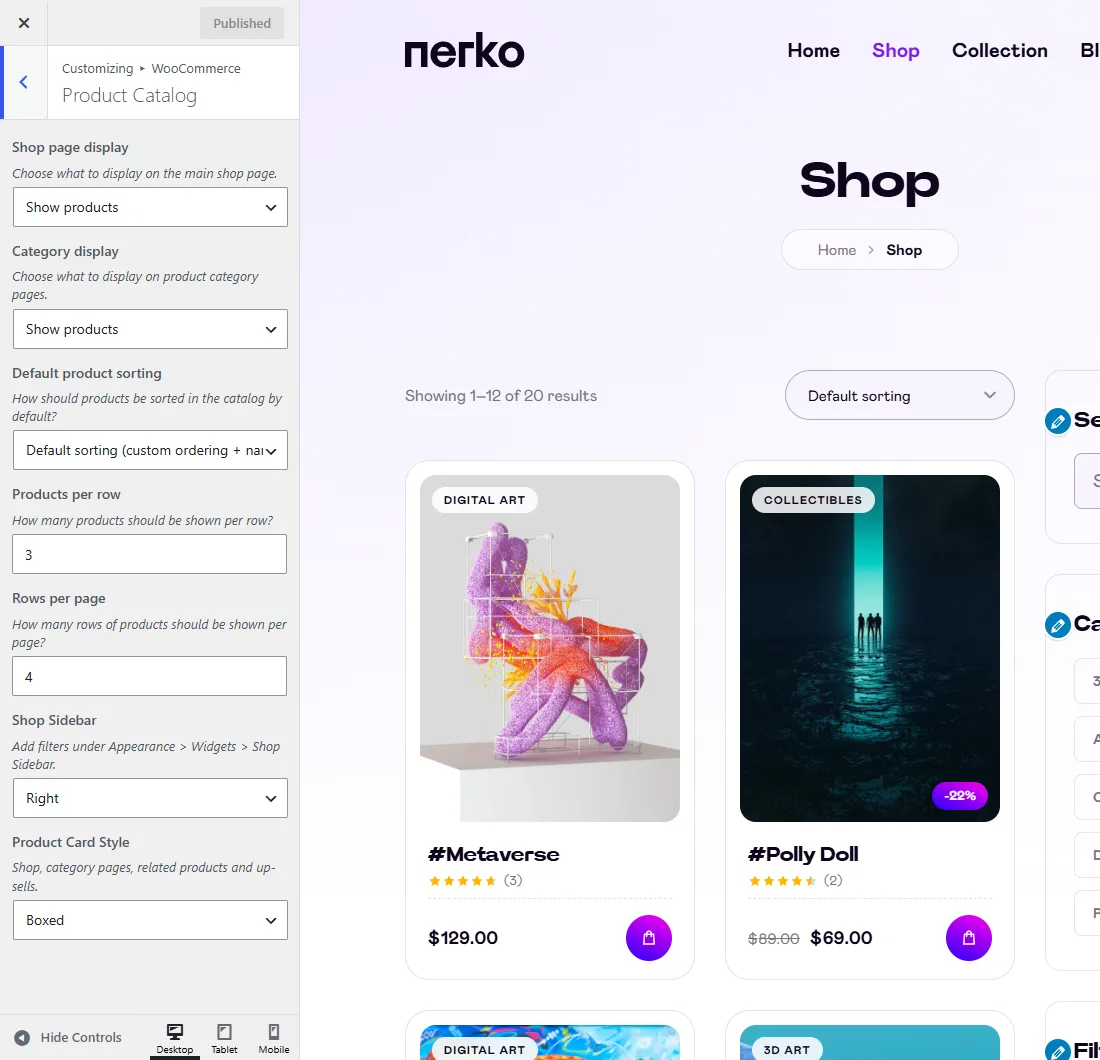
Cards show a second image on hover (the first gallery image), the rating, the price and an add to cart button. The Products widget has its own Card Style control, so a home page can use a different style than the shop.
Try the styles on the demo: add ?box-layout, ?glow-layout or ?overlay-layout to the shop link.
Shop Sidebar & Filters
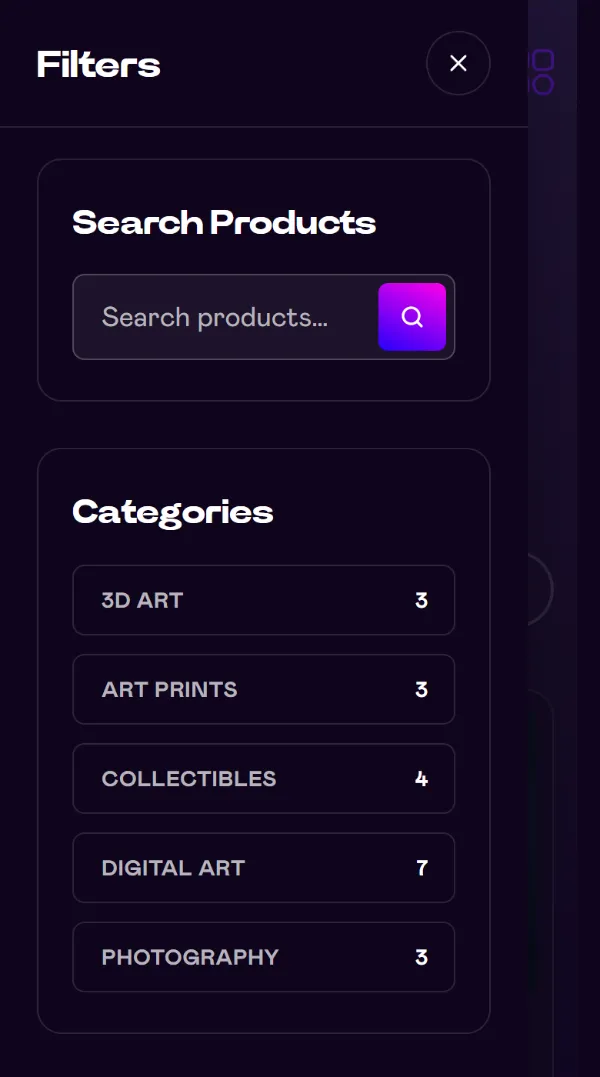
Set the position in Product Catalog › Shop Sidebar: Right, Left or No sidebar. Add filters (search, categories, price filter and others) to the Shop Sidebar in Appearance › Widgets.
On tablets and phones the sidebar becomes a drawer: a Filter button in the shop toolbar slides it in, and it closes with the close button, the backdrop or the Esc key.
Cart, Checkout & Mini Cart
Classic or block pages
Nerko styles both kinds of Cart and Checkout pages: WooCommerce's blocks and the classic shortcodes. The demo uses the classic ones. To switch a page, edit it and replace the Cart or Checkout block with a Shortcode block containing [woocommerce_cart] or [woocommerce_checkout] (or the other way round).
Side mini cart
Add the Cart widget to a header. On Click opens the cart panel or goes to the cart page; Open After Add to Cart slides the panel in when a product is added. You can set the Panel Title, show the Item Count and Subtotal, and hide the count when the cart is empty.
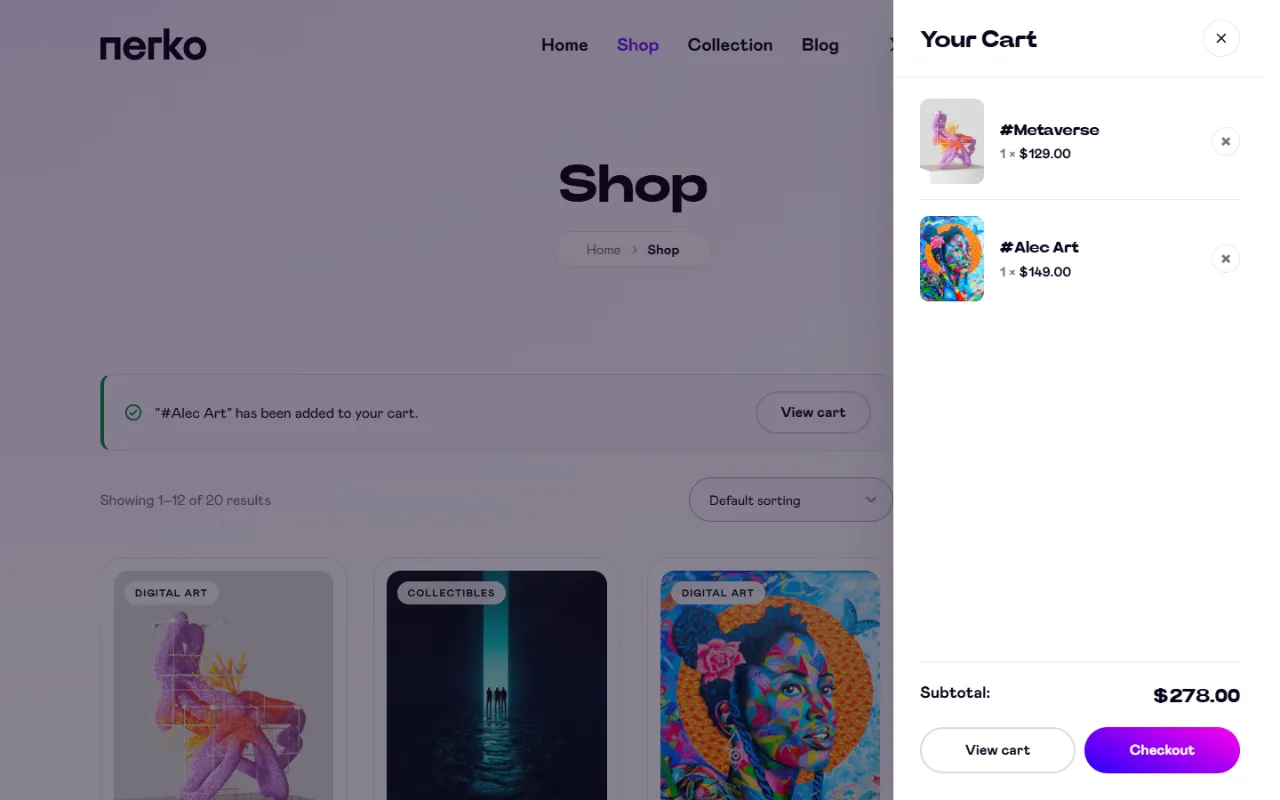
My Account, login and register, orders, addresses and the thank-you page are styled too.
RTL & Arabic
Nerko supports right-to-left languages such as Arabic, Hebrew and Persian. See the Arabic RTL demo (opens in a new tab).
- Go to Settings › General, set Site Language to your language (for example العربية) and click Save Changes.
- That's it: WordPress switches to right-to-left, and Nerko loads its mirrored stylesheets by itself.
- For Arabic text, pick Arabic fonts in Elementor's Global Fonts. The Arabic demo uses Readex Pro for headings and IBM Plex Sans Arabic for text.
- The theme and Nerko Core include a full Arabic translation.
- The template library switches to its Arabic RTL blocks.
- Latin hashtags and @names stay left-to-right inside Arabic text, and prices keep their order.
- The light/dark button moves to the bottom left, and the filter drawer slides in from the right.
Translation & WPML
Nerko is translation ready. The theme's template file is nerko/languages/nerko.pot and the plugin's is nerko-core/languages/nerkocore.pot. Arabic translations are included for both.
With Loco Translate (easiest)
- Install the free Loco Translate plugin from Plugins › Add New Plugin.
- Go to Loco Translate › Themes › Nerko (or Plugins › Nerko Core) and click New language.
- Choose your language, translate the strings and click Save.
Texts you type in Elementor or the Customizer are your content: change them right where you typed them.
Multilingual sites
Nerko works with WPML and Polylang. Headers, footers, mega menus, the 404 page and forms follow the visitor's language, widget texts and Customizer texts can be translated, and the Language Switcher widget lists your languages as a dropdown or an inline list.
SEO
Nerko Core adds the basics every page needs, with nothing to set up:
- A meta description from the page's excerpt, its first text, or the title and tagline. Pages get an Excerpt box for this.
- Open Graph and Twitter card tags for nice link previews.
- Canonical links on archive pages and BlogPosting schema on posts.
If you install an SEO plugin (Yoast SEO, Rank Math, All in One SEO, SEOPress, The SEO Framework, Squirrly, Slim SEO, SmartCrawl, WP Meta SEO, or Jetpack's SEO tools), Nerko steps aside and lets it do the job.
Updating Nerko
Back up your site (files and database) before every update.
Update the theme
- Download the latest
nerko.zip(see What You Download). - Go to Appearance › Themes › Add Theme › Upload Theme and upload it.
- Click Replace active with uploaded. Your pages and settings stay as they are.
Update Nerko Core
Nerko Core updates come through WordPress's normal updates, in Dashboard › Updates or on the Plugins page. Before it updates, a window asks you to confirm that you have a recent backup.
Reset the Site
Want to start over? Reset clears your site without reinstalling WordPress. Delete only the parts you choose, such as the demo posts and their images, or take the whole site back to a fresh WordPress. Go to Nerko Core › Reset.
A reset can't be undone. Deleted items don't go to the Trash, and only a backup can bring them back. Back up your site first (files and database), or try it on a staging copy.
Reset only what you choose
- Tick what to deleteKeep Choose what to reset selected and tick the parts you want to delete. Each row shows how many items it holds. The Summary on the right lists your choice.
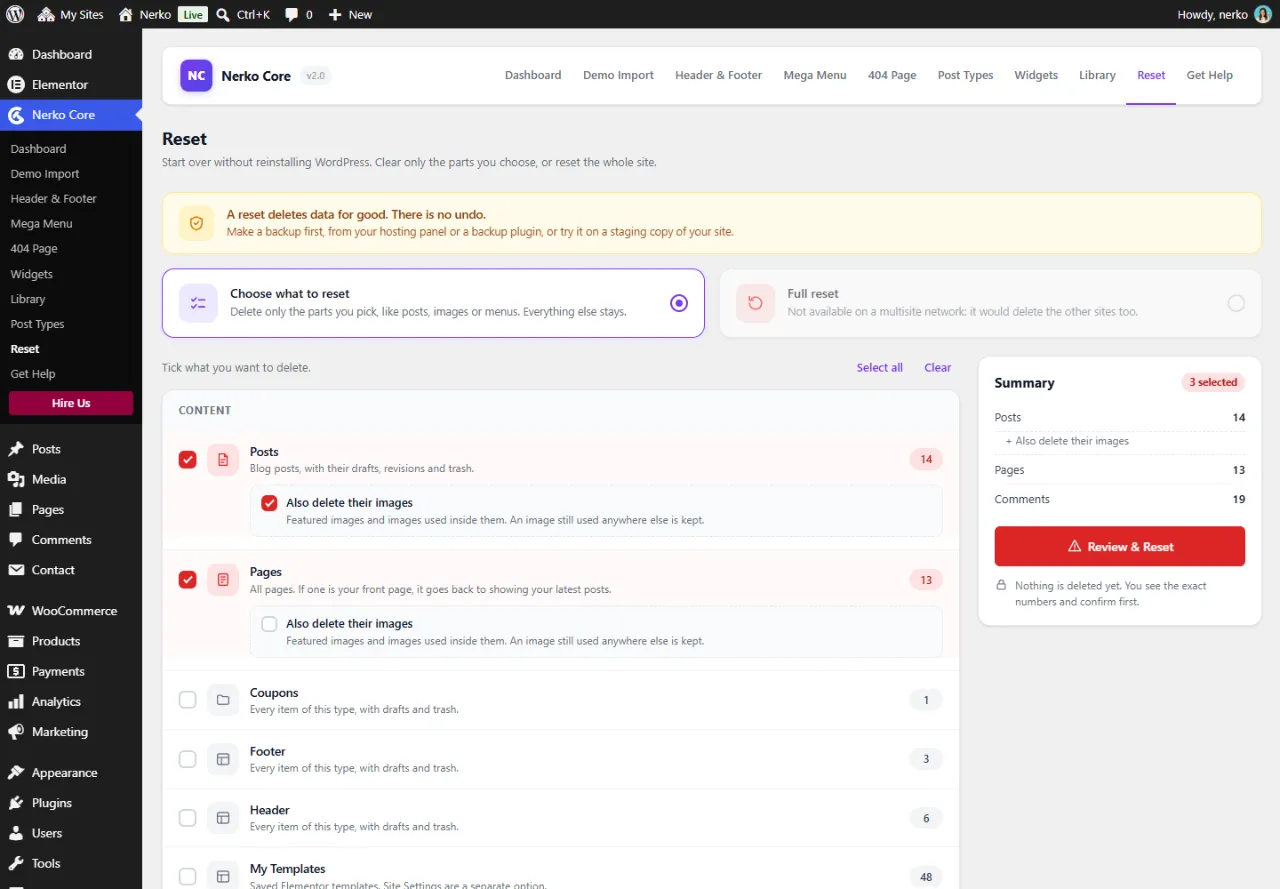
Nerko Core › Reset - Images too?For posts, pages, products and other content, tick Also delete their images to remove their featured images and the images used inside them. An image that is still used anywhere else is kept.
- ReviewClick Review & Reset. Nothing is deleted yet: the window shows exactly how many items will go.
- ConfirmTick I have a backup, or I don't need this data any more, type
resetand click Reset Now.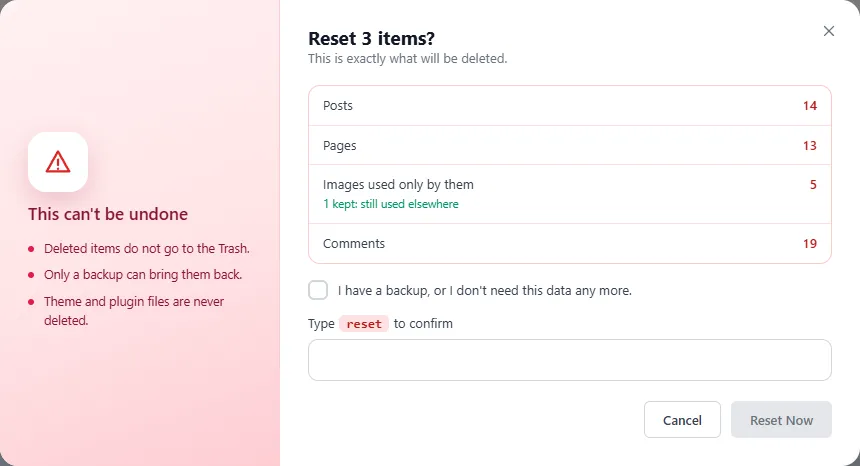
The confirm window
Everything you didn't tick stays as it is. Here is what each part does:
| Part | What is reset |
|---|---|
| Posts, Pages, Products, Headers, Footers and other types | Every item of that type, with its drafts, revisions and trash. If your front page is deleted, the homepage shows your latest posts. |
| Media Library | Every image and file, removed from the server too. |
| Menus | All menus and their links. Menu locations are cleared. |
| Categories, Tags and other taxonomies | All of them, except the default category WordPress needs. Posts are not deleted. |
| Comments | Comments, product reviews, pingbacks, spam and trash. |
| Widgets | Sidebar and footer widgets are removed, so the areas start empty. |
| Theme settings | Customizer options and Additional CSS go back to Nerko's defaults. Menus stay in place. |
| Elementor Site Settings | Global colors, fonts, buttons and layout go back to Nerko's defaults. |
| Nerko Core settings | Widgets you turned off on the Widgets page are turned on again. |
| Other users | Every account except yours, other admins too. Their posts move to your account. |
| Temporary data & cache | Expired and cached data (transients) and Elementor CSS. Safe: it rebuilds itself. |
Remove the demo content, keep the design. Tick the content you don't need and leave Theme settings and Elementor Site Settings unticked. Your colors and fonts stay. After you delete content or media, Demo Import starts clean, so you can import a demo again later.
Full reset
Full reset takes your site back to a fresh WordPress, like a new install, without logging you out. Choose Full reset, check what will be deleted and kept, then click Review & Reset and confirm the same way.
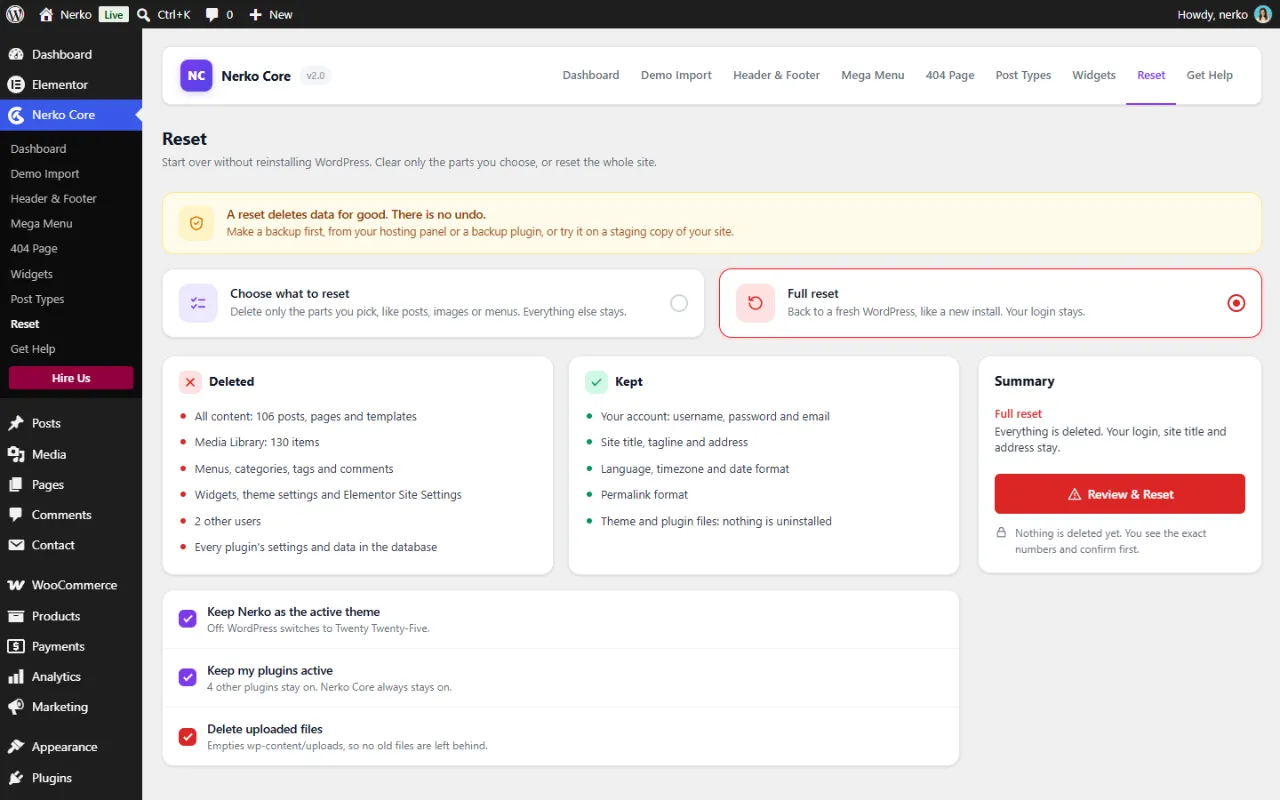
Deleted: all posts, pages, products and templates, the Media Library, menus, categories, tags, comments, widgets, theme settings, Elementor Site Settings, other users, and every plugin's settings and data in the database.
Kept:
- Your account: username, password and email.
- Site title, tagline and address.
- Language, timezone and date format.
- Permalink format.
- Theme and plugin files: nothing is uninstalled.
Three options below the lists:
- Keep Nerko as the active theme is on by default. Turn it off to switch to the default WordPress theme.
- Keep my plugins active is on by default. Turn it off to deactivate the other plugins; Nerko Core always stays on.
- Delete uploaded files empties
wp-content/uploads, so no old files are left behind.
When it finishes, the page reloads and says "Your site is fresh again". Click Import a Demo to start building again. If WooCommerce stays active, it creates its Shop, Cart, Checkout and My account pages again by itself.
Full reset is not available on a WordPress multisite network, because it would delete the other sites too, or on a site that shares its user table with another site. The card shows the reason. You can still reset the parts you choose.
How it works
- Nothing is deleted until you confirm. You see the exact numbers first.
- The reset runs in small steps with a progress ring, so large sites don't time out. Keep the tab open until it finishes.
- If the connection drops, nothing is lost. Click Continue to carry on where it stopped. If you closed the page, a banner offers Continue or Discard when you come back.
- Only administrators can open the Reset page.
- Theme and plugin files are never deleted.
Speed Tips
Nerko is built to be fast: local fonts, lazy images, deferred scripts, minified files, and shop and form files loaded only where needed. The first section's images load first on their own. These steps make your site even faster:
- Turn off the widgets you don't use in Nerko Core › Widgets.
- Use a caching plugin (or your host's cache) and keep PHP up to date.
- Upload images at the size they are shown, in WebP when you can.
- Keep the Preloader off (the default) so content shows right away.
- In Elementor › Settings › Features, keep the performance features active.
Troubleshooting
| Problem | Fix |
|---|---|
| "The theme is missing the style.css stylesheet." | You uploaded the full package. Upload nerko.zip instead (see What You Download). |
| "This theme doesn't work with your version of PHP." | Ask your host to switch to PHP 8.2 or newer. |
| Nerko Core doesn't install | Your server blocks outgoing connections. Ask your host to allow them, then try again. |
| Pages show "Not Found" | Go to Settings › Permalinks and click Save Changes. |
| Styles look old after a change | Go to Elementor › Tools, click Clear Files & Data, then clear your cache plugin. |
| The site stays dark (or light) | Your browser remembers the last choice. Click the light/dark button, or open the site with ?schema=light. |
| The mega menu doesn't show | Mega menus work on top-level items only. Check Show a mega menu on the item and that the mega menu is published. |
| A header shows on the wrong pages | Check the display rules; the most specific rule wins. Look for the overlap warning in Header & Footer. |
| The demo import stops | Click Continue Import. If it stops again, check the red rows in System Status, for example the max execution time. |
| You want to remove the demo content or start over | Go to Nerko Core › Reset. Delete only the parts you choose, or run a full reset for a fresh WordPress. Back up first. See Reset the Site. |
Support
We're happy to help with installing, setting up and using Nerko. Nerko Core › Get Help has links to documentation, video tutorials and support. When you write to us, please include:
- Your site address and what you tried.
- Screenshots of the problem.
- Your WordPress, PHP and Nerko versions (Tools › Site Health › Info).
Support covers the theme's own features and bugs. Custom changes and third-party plugins aren't included, but we're glad to point you in the right direction.
Still need help?
Send us a message and we'll get back to you.
Changelog
Version 2.0
Theme and Nerko Core- NewAll 5 homes rebuilt with Elementor containers and native widgets, fully editable with free Elementor.
- NewHome Five, a full Arabic RTL demo and Arabic translations for the theme and Nerko Core.
- NewWooCommerce styling: shop, 3 product card styles, filter drawer, side mini cart, classic and block cart and checkout, My Account.
- NewLight and dark mode with a visitor toggle and
?schemalinks. - NewNerko Core: header & footer builder with display rules, mega menu, 404 builder, template library (48 blocks, English and Arabic), demo import, reset page, widget manager, post types, motion effects.
- NewColors and fonts from Elementor Site Settings, WPML and Polylang support, language switcher widget.
- ImprovedAccessibility, SEO tags and speed across the theme.
Version 1.0
January 2023- Initial release.
Credits
Nerko is built with these great open-source projects:
- WordPress & Elementor
- Bootstrap
- Font Awesome
- anime.js
- Jarallax
- Parallax.js
- Swiper (via Elementor)
- TGM Plugin Activation
Fonts: Power Grotesk (headings) and Mabry Pro (text).