

Xeco Documentation
Everything you need to install, set up and customize your ICO or crypto website, step by step and with screenshots.
Welcome to Xeco
Thank you for choosing Xeco! Xeco is an ICO and crypto landing WordPress theme for Elementor, made for token sales, crypto startups, blockchain projects and Web3 products.
It comes with 2 home demos in English and Arabic (4 demos in all), 33 custom Elementor widgets including a live-price crypto converter and a token sale, a Buy Token order page, a library of 31 ready-made templates, a header and footer builder, mega menus, a dark WooCommerce shop with wishlist and quick view, and full right-to-left support.
New to WordPress? Follow three sections in order: Install the Theme, Install Plugins and Import a Demo. Your site will look like the live demo, ready for your own text and images.
Features
A quick look at what's inside Xeco.
4 Demos
Home One and Home Two, each in English and in Arabic, with their inner pages.
33 Elementor Widgets
Crypto converter, coin ticker, token sale, roadmap, charts, countdown and more.
Live Crypto Prices
Optional CoinGecko prices, fetched by your server every 10 minutes.
Buy Token Page
An order form that opens with the converter's amounts filled in.
Template Library
29 blocks and 2 pages you can preview and insert in one click.
One-Click Demo Import
Pages, images, menus, forms, shop and settings in about a minute.
Header & Footer Builder
Design them in Elementor and choose where each one appears.
Mega Menu & 404 Builder
Rich dropdowns and your own 404 page, built visually.
Global Colors & Fonts
Change them once in Elementor's Site Settings and the whole site follows.
WooCommerce Shop
Dark shop, wishlist, quick view, side mini cart, cart and checkout.
RTL, WPML & Polylang
Right-to-left layouts, Arabic demos and multilingual headers and footers.
Free Elementor
Everything works with the free Elementor plugin. No Pro license needed.
Requirements
Xeco runs on any good WordPress hosting. Check that your server meets these values. If you're not sure, send this table to your hosting company.
| Setting | Minimum | Recommended |
|---|---|---|
| WordPress | 6.0 | The latest version (tested up to 7.1) |
| PHP | 8.2 | 8.2 or newer |
| PHP memory limit | 128M | 256M or more |
| Max execution time | 10 seconds | 60 seconds or more |
| Max input vars | 1000 | 3000 |
| PHP extensions | XML (XMLReader, DOMDocument, SimpleXML) | Also GD or Imagick for images |
| Outgoing connections | Allowed | Needed for demo images and live crypto prices |
You don't have to check these by hand. The Demo Import page tests your server and shows anything that needs fixing.
Raising PHP limits
Most hosts let you change PHP values in their control panel (look for "PHP settings" or "MultiPHP INI Editor"). If yours uses a php.ini file, these lines are enough:
memory_limit = 256M
max_execution_time = 120
max_input_vars = 3000
To raise the memory WordPress itself may use, add this line to wp-config.php, just above the line /* That's all, stop editing! */:
define( 'WP_MEMORY_LIMIT', '256M' );WordPress won't activate Xeco on PHP older than 8.2. It shows "This theme doesn't work with your version of PHP". Ask your host to switch your site to PHP 8.2 or newer; it takes them a minute.
What You Download
| Where you bought | What to download |
|---|---|
| ThemeGenix | Open the download link from your purchase email (Lemon Squeezy). You get the full package. |
| ThemeForest | Go to Downloads in your Envato account and choose All files & documentation. |
Unzip the package on your computer. Inside you'll find:
- xeco.zip: the theme. This is the file you upload to WordPress. Don't unzip it.
- Documentation: a link to this page.
The Xeco Core plugin, the demo content and the template library come with the theme: WordPress installs Xeco Core for you after you activate Xeco (see Install Plugins).
Uploading the whole package instead of xeco.zip gives the error "The package could not be installed. The theme is missing the style.css stylesheet." Upload only the theme file.
Live Demos
Two homes, each in English and Arabic. Click a card to open the live demo.


Each demo comes with its inner pages: Blog, single post, Shop, product, Cart, Checkout, My Account (login and register), Wishlist and Contact. Home Two also has the Buy Token page.
Install the Theme
From the WordPress dashboard
- Open the theme uploaderGo to Appearance › Themes, click Add Theme, then click Upload Theme.
- Upload xeco.zipChoose xeco.zip from the package and click Install Now.
- ActivateWhen WordPress says "Theme installed successfully", click Activate.
With FTP (if the upload fails)
Some hosts limit the upload size. In that case unzip xeco.zip and upload the xeco folder to wp-content/themes/ with an FTP program or your host's file manager. Then activate Xeco in Appearance › Themes.
Install Plugins
After you activate Xeco, a notice at the top of the dashboard lists the plugins it uses. Click Begin installing plugins, select them all, choose Install, then activate them. The Demo Import page can also install everything for you with one button.
| Plugin | Needed for | Status |
|---|---|---|
| Elementor | Building and editing every page | Required |
| Xeco Core | Widgets, header and footer builder, demo import, library, wishlist, quick view | Required |
| WooCommerce | The shop, cart, checkout and My Account pages | Required |
| Contact Form 7 | Contact, newsletter and Buy Token forms | Recommended |
| Breadcrumb NavXT | Breadcrumb trail under page titles | Recommended |
| Classic Editor | Writing blog posts in the classic editor | Optional |
Xeco 2.0 no longer needs Kirki, Advanced Custom Fields, Header Footer Elementor, One Click Demo Import, the WPC wishlist and quick view plugins or Mailchimp for WP. Xeco Core does their work.
Import a Demo
One click makes your site look exactly like the live demo, with its pages, images, menus, headers, footers, forms, shop and settings. Go to Xeco Core › Demo Import.
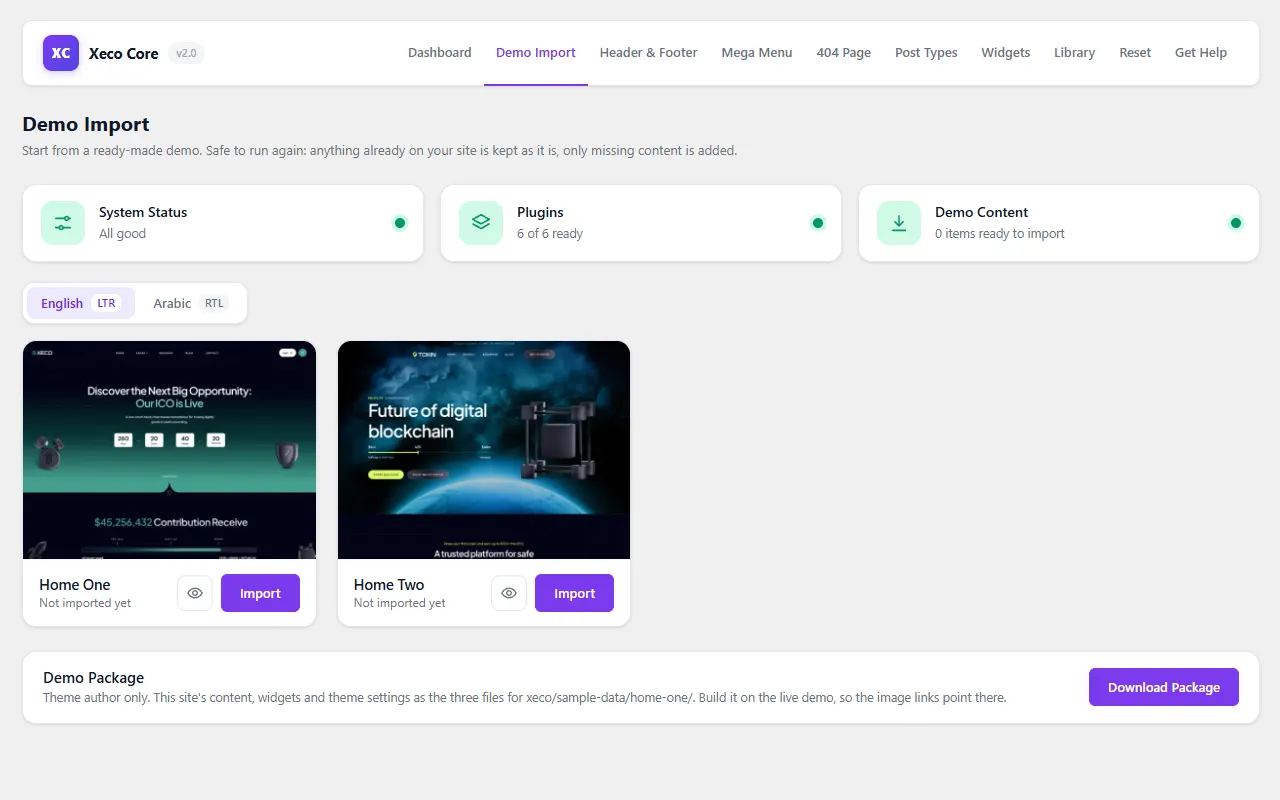
1. Check the three tiles
- System Status tests your server. Green is fine, yellow works but is worth fixing, red stops the import. Each row says how to fix it, then click Check Again.
- Plugins must say all are ready. If one is missing, click Install & Activate All.
- Demo Content shows how many items will be added.
2. Choose the language
Use the English / Arabic switch above the demos. For an Arabic site, set your site language to Arabic first (see RTL & Arabic); the page then opens on the Arabic demos by itself.
3. Import
- Pick a demoClick the eye icon for a live preview, or click Import on Home One or Home Two.
- Choose what to bring inContent (pages, posts, products, images, menus and forms) is always included. Keep Widgets and Theme settings ticked for an exact copy of the demo.
- Start the importClick Start Import and keep the tab open. On a normal host it takes about a minute.
- DoneWhen you see that your demo is ready, click View Your Site.
What the import does
- Adds the demo's pages, blog posts, products, headers, footers and contact forms.
- Downloads the demo images into your Media Library.
- Sets your homepage, the blog page and the privacy page.
- Puts the menu in its location and fills the sidebar widgets.
- Brings in the demo's Elementor colors, fonts and settings.
- Switches WooCommerce's cart and checkout pages to the classic layout the demo uses, only when you never edited them.
- Turns on pretty links (
/sample-page/) if your site still uses plain links. - Removes WordPress's untouched sample content: "Hello world!", the Sample Page, the draft Privacy Policy and Contact Form 7's "Contact form 1".
Safe to run again
If the import stops (closed tab, lost connection), open the page again and click Continue Import. Running it again never duplicates content: anything already on your site is kept, only missing items are added. Nothing you made yourself is touched.
Want a different home later? Insert its sections from the Template Library into any page, then set that page as your homepage.
Child Theme
You only need a child theme if you plan to edit the theme's PHP or CSS files. Colors, fonts, headers, footers and pages are all changed in WordPress and survive updates without one.
To make one, create a folder xeco-child in wp-content/themes/ with these two files, then activate "Xeco Child":
/*
Theme Name: Xeco Child
Template: xeco
Version: 1.0
*/<?php
add_action( 'wp_enqueue_scripts', function () {
wp_enqueue_style( 'xeco-child', get_stylesheet_uri(), [], '1.0' );
}, 20 );Xeco Core Dashboard
Xeco Core adds its own menu to the dashboard. The tabs at the top lead to every tool: Dashboard, Demo Import, Header & Footer, Mega Menu, 404 Page, Widgets, Reset and Get Help.

Homepage & Blog Page
The demo import sets these for you. To change them, go to Settings › Reading, choose A static page, then pick your Homepage (for example "Home" or "Home Two") and your Posts page ("Blog").
Logo & Site Icon
Logo in the header
The demo headers use the Logo widget. Go to Xeco Core › Header & Footer, click Edit with Elementor on your header, click the logo and choose your image. Do the same in the footer.
Site icon (favicon)
Open any Elementor page, click the menu at the top left, choose Site Settings › Site Identity and upload your icon (512 × 512 px). Elementor keeps this icon in sync with WordPress's own site icon.
Theme Options
Go to Appearance › Customize › Xeco Customizer. Each section shows a live preview as you change it.
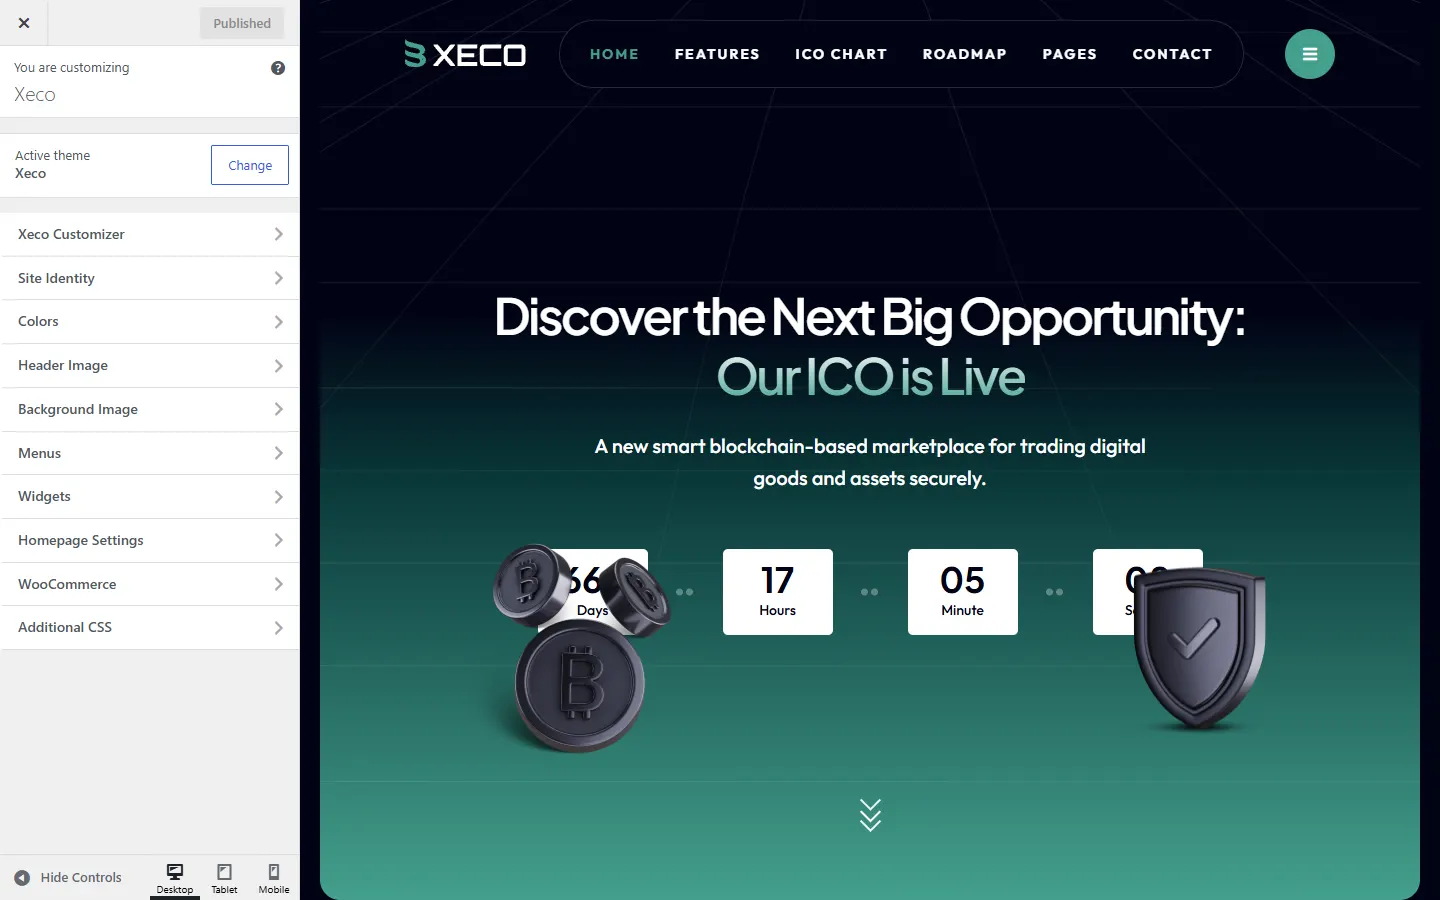
| Section | What it changes |
|---|---|
| Xeco Default Setting | Preloader and back to top button |
| Header Right / Offcanvas / Mobile Menu | The theme's own header, used when you have no Elementor header |
| Breadcrumb Setting | Page title area: background image, gradient colors, on or off |
| Blog Setting | Post meta (category, author, date, comments), share buttons, read more button and blog title |
| Footer Settings | The theme's own footer and copyright text ({year} shows the current year) |
| WooCommerce Setting | Wishlist and quick view on or off |
| 404 Page | Title, text and button of the theme's 404 page |
| Login & Register Page | Texts, image and logo of the full-screen account pages |
When Elementor is active, colors and fonts are set in Elementor's Site Settings instead. The Customizer shows a button that opens them (see Colors & Fonts).
Colors & Fonts
Open any page with Elementor, click the menu at the top left and choose Site Settings. Global Colors and Global Fonts control the whole theme: Elementor pages, the blog, the shop, headers and footers.
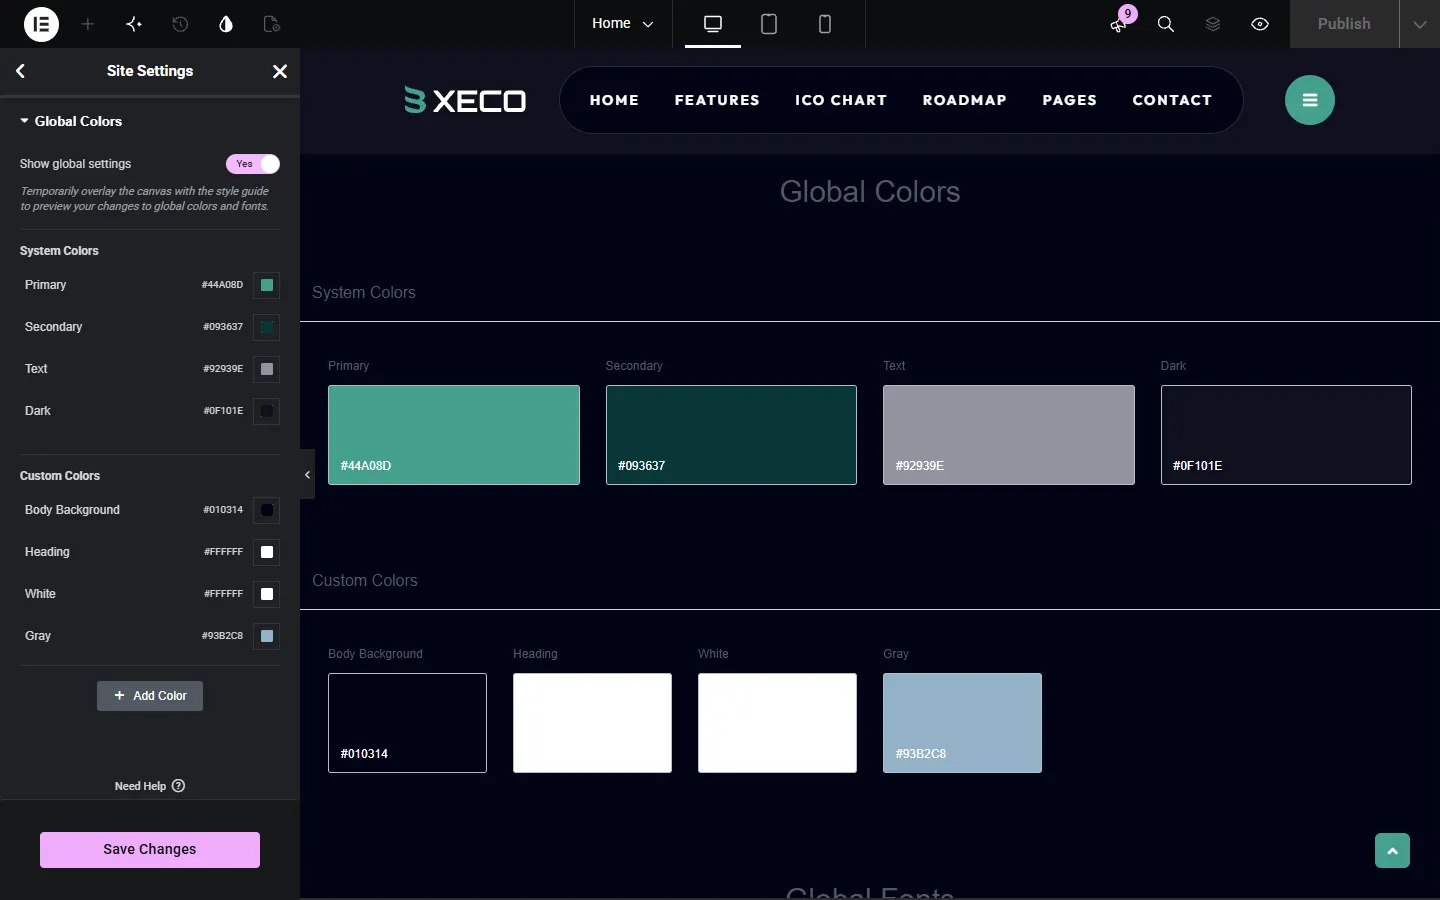
| Color | Used for | Home One | Home Two |
|---|---|---|---|
| Primary | Buttons, links, highlights | #44A08D | #D6F966 |
| Secondary | Gradients and dark accents | #093637 | #093637 |
| Text | Body text | #92939E | #92939E |
| Body Background | Page background | #010314 | #010314 |
The fonts are Plus Jakarta Sans for headings and Outfit for text. Both load from your own server. Choose any other Google font in Global Fonts and Elementor loads it instead; Arabic text uses Readex Pro automatically.
Any primary color works. When you pick a light primary color, text on it (buttons, badges, cart count, check marks) turns dark by itself so it stays readable.
Header & Footer
Go to Xeco Core › Header & Footer. Every header and footer is an Elementor template with its own display rules.
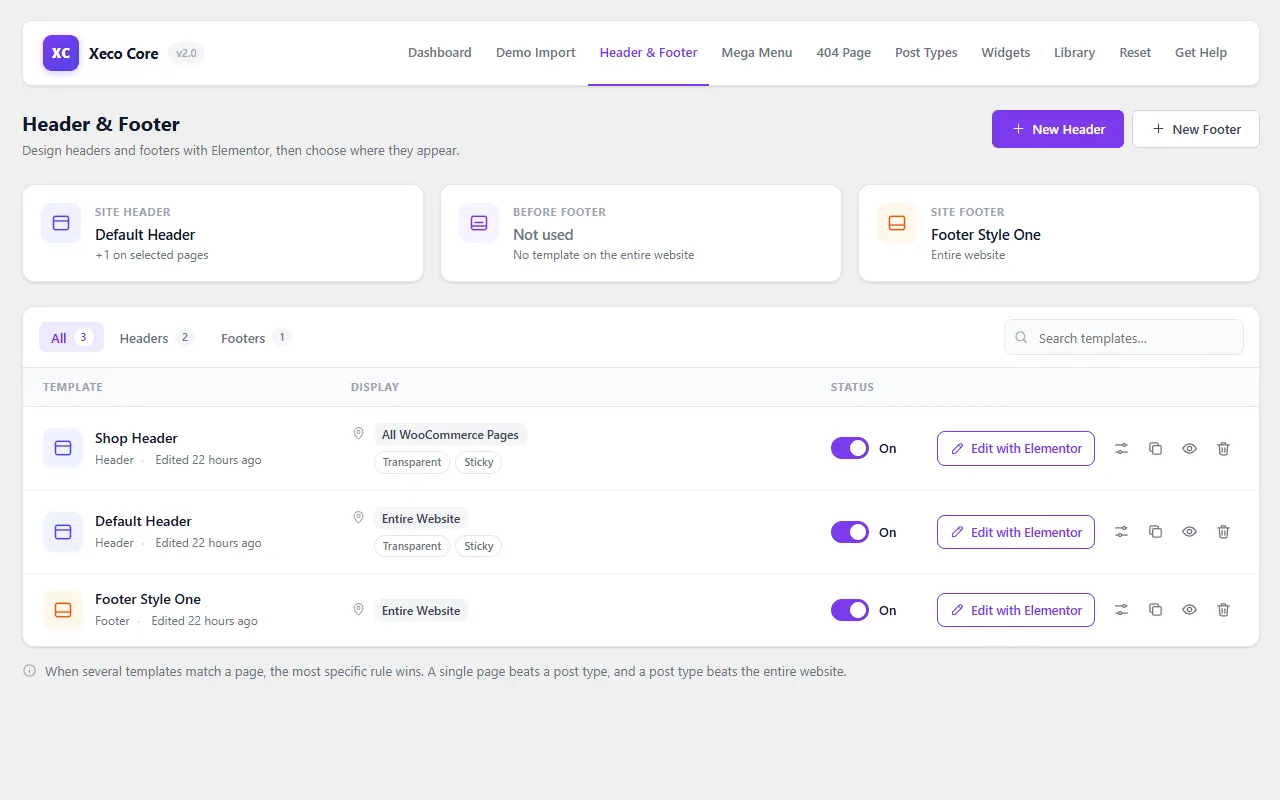
Create a header or footer
- Add itClick New Header or New Footer and give it a name.
- Choose where it showsSet the display rules (below), then save.
- Design itClick Edit with Elementor. Use the Logo, Nav Menu, Header Button, Header Cart, Header Notice, Off Canvas, Social List and Copyright widgets, or insert a ready header from the Template Library.
Display rules
Show a template on the Entire Website, All Singulars, All Archives, special pages (Front Page, Blog, Search Results, 404, Date and Author archives), All WooCommerce Pages, the WooCommerce Shop, or specific pages, posts and terms. Exclusion rules and user roles (logged in or out) narrow it down. The most specific rule wins, so the demo uses one header for the site and a shop header for WooCommerce pages.
Sticky and transparent
Each header has options for a sticky header and a transparent header that sits over the page's top section, as in both demos.
Mega Menu
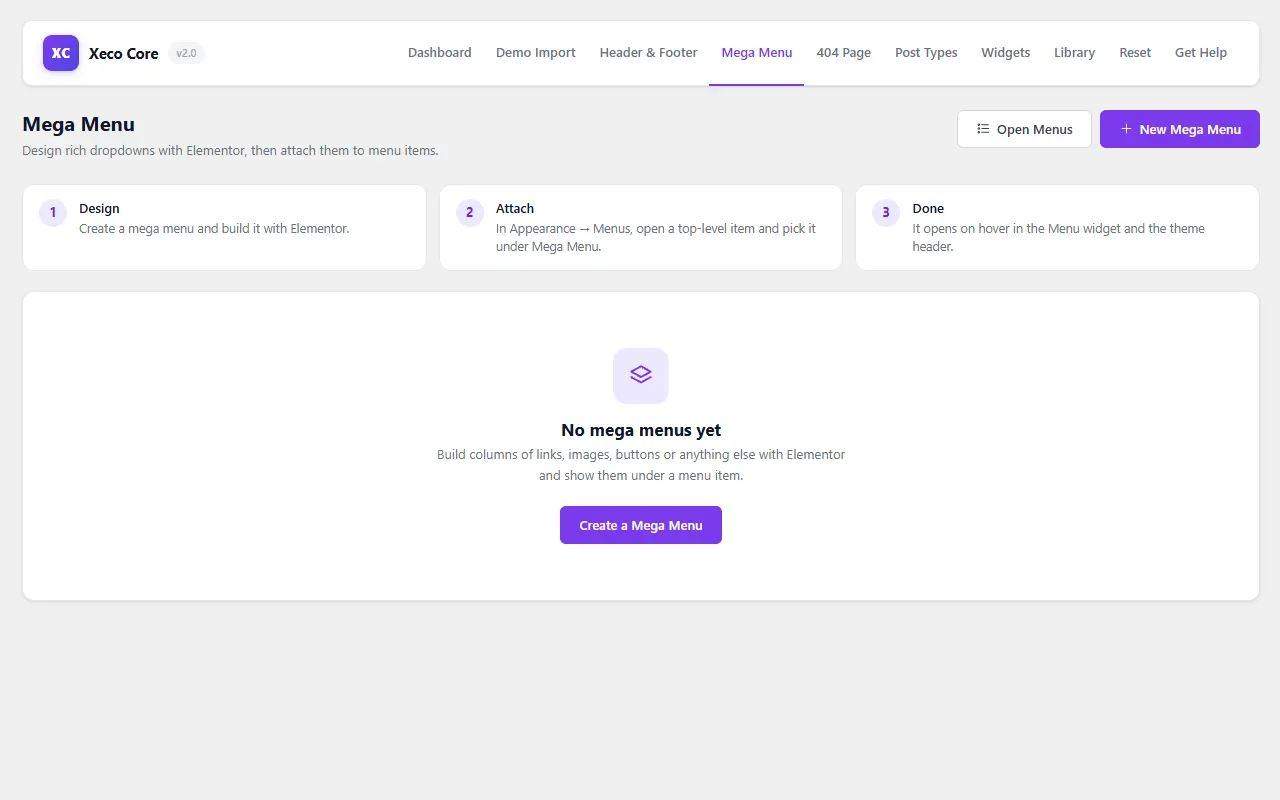
- DesignIn Xeco Core › Mega Menu click New Mega Menu and build it with Elementor: columns of links, images, buttons or anything else.
- AttachIn Appearance › Menus open a top-level item and pick your mega menu under Mega Menu.
- DoneIt opens on hover in the Nav Menu widget and the theme's header.
Breadcrumb
Inner pages show a title area with a breadcrumb trail. Change its background, gradient colors or turn it off in Customize › Xeco Customizer › Breadcrumb Setting. The trail itself comes from the free Breadcrumb NavXT plugin.
To hide it on one page, edit the page and tick Hide Breadcrumb in the options box under the editor.
Blog
Write posts in Posts › Add New and give each one a featured image. Post meta, share buttons, the read more button and the blog title are in Customize › Xeco Customizer › Blog Setting. The Latest Posts widget shows your newest posts on any Elementor page.
404 Page
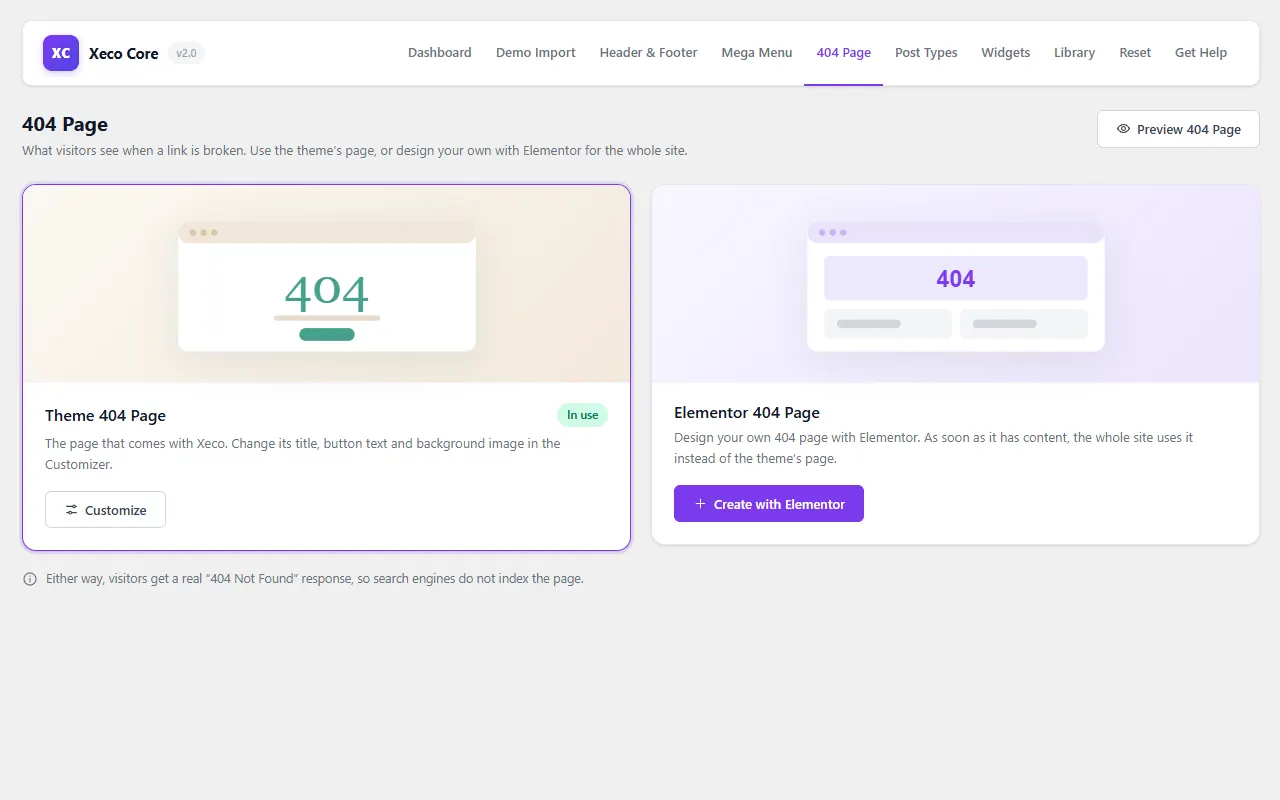
In Xeco Core › 404 Page keep the theme's 404 page (its title, text and button change in Customize › Xeco Customizer › 404 Page) or click Create with Elementor to design your own. Either way visitors get a real "404 Not Found" response, so search engines don't index the page.
Login & Register
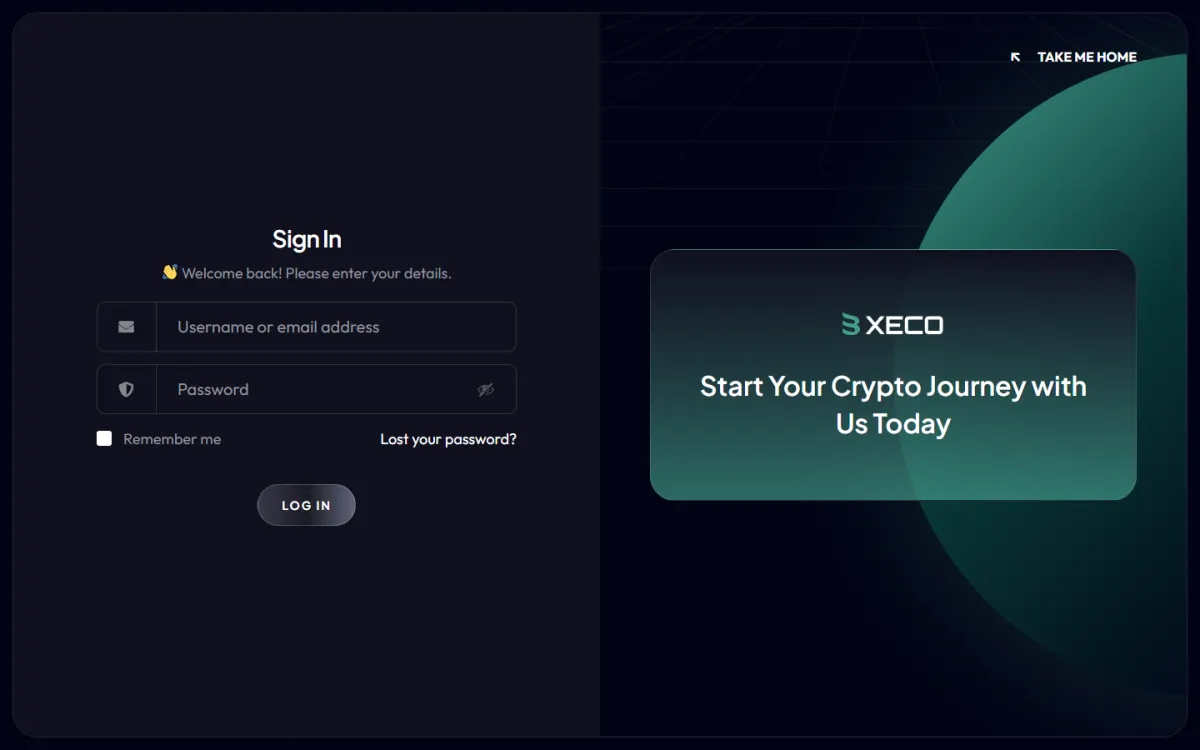
The WooCommerce My Account page shows full-screen login, register and lost password forms to visitors. Change their texts, image and logo in Customize › Xeco Customizer › Login & Register Page. Turn on registration in WooCommerce › Settings › Accounts & Privacy.
Crypto Converter
The Crypto Converter (Home Two) lets visitors type what they pay or get and sends both amounts to your order form.

Currencies and prices
Under Currencies the widget has two lists: what visitors pay with and what they get. Each currency has:
- Currency: the code shown in the dropdown, like
USDorBTC. - Icon: a small image shown next to the code.
- Price: the price of 1 unit in the Price Currency (USD by default). Your own token keeps the price you type.
- CoinGecko ID: for live prices of a coin. It's the last part of the coin's coingecko.com link, for example
bitcoin,ethereumorsolana. Leave it empty for USD, EUR and other world currencies.
Amount is the number shown first; the amount to pay is calculated from it.
Live prices
Switch on Live Prices and the prices update from CoinGecko: world currencies and every coin with a CoinGecko ID.
- Your server asks CoinGecko at most every 10 minutes and remembers the answer, so busy sites make no extra requests.
- No API key is needed, and no visitor data is sent to CoinGecko.
- If CoinGecko can't be reached, the last known prices (or your typed prices) are shown.
Buy Now button
Set Button Text and Button Link. With Send Amounts on, the link gets pay_amount, pay_currency, get_amount and get_currency added to it. Any Contact Form 7 field with the same name and default:get is filled in, as on the Buy Token page.
Buy Token Page

Home Two's Buy Now buttons open the Buy Token page. Its form, "Token Order" in Contact › Contact Forms, opens with the converter's amounts and currencies filled in. When a visitor changes one amount, the other follows the same rate.
The form asks for the buyer's name, email and wallet address. On submit, you get the order by email and the buyer gets a copy. Change both emails in the form's Mail and Mail (2) tabs.
[text* pay_amount default:get]
[select pay_currency default:get "USD" "EUR" "GBP"]
[text* get_amount default:get]
[select get_currency default:get "BTC" "ETH" "USDT"]
Xeco takes the order; it does not connect wallets or take crypto payments. Reply to each order with your payment details, and check the laws on token sales where you and your buyers live.
Keep the currencies in the form's dropdowns the same as in the converter, so every choice can be filled in.
Token Sale & Countdown
- Banner Countdown counts down to the date you set (Home One's hero). Change the date in the widget's settings.
- Progress Bar shows the sale progress with soft cap, hard cap and raised amount.
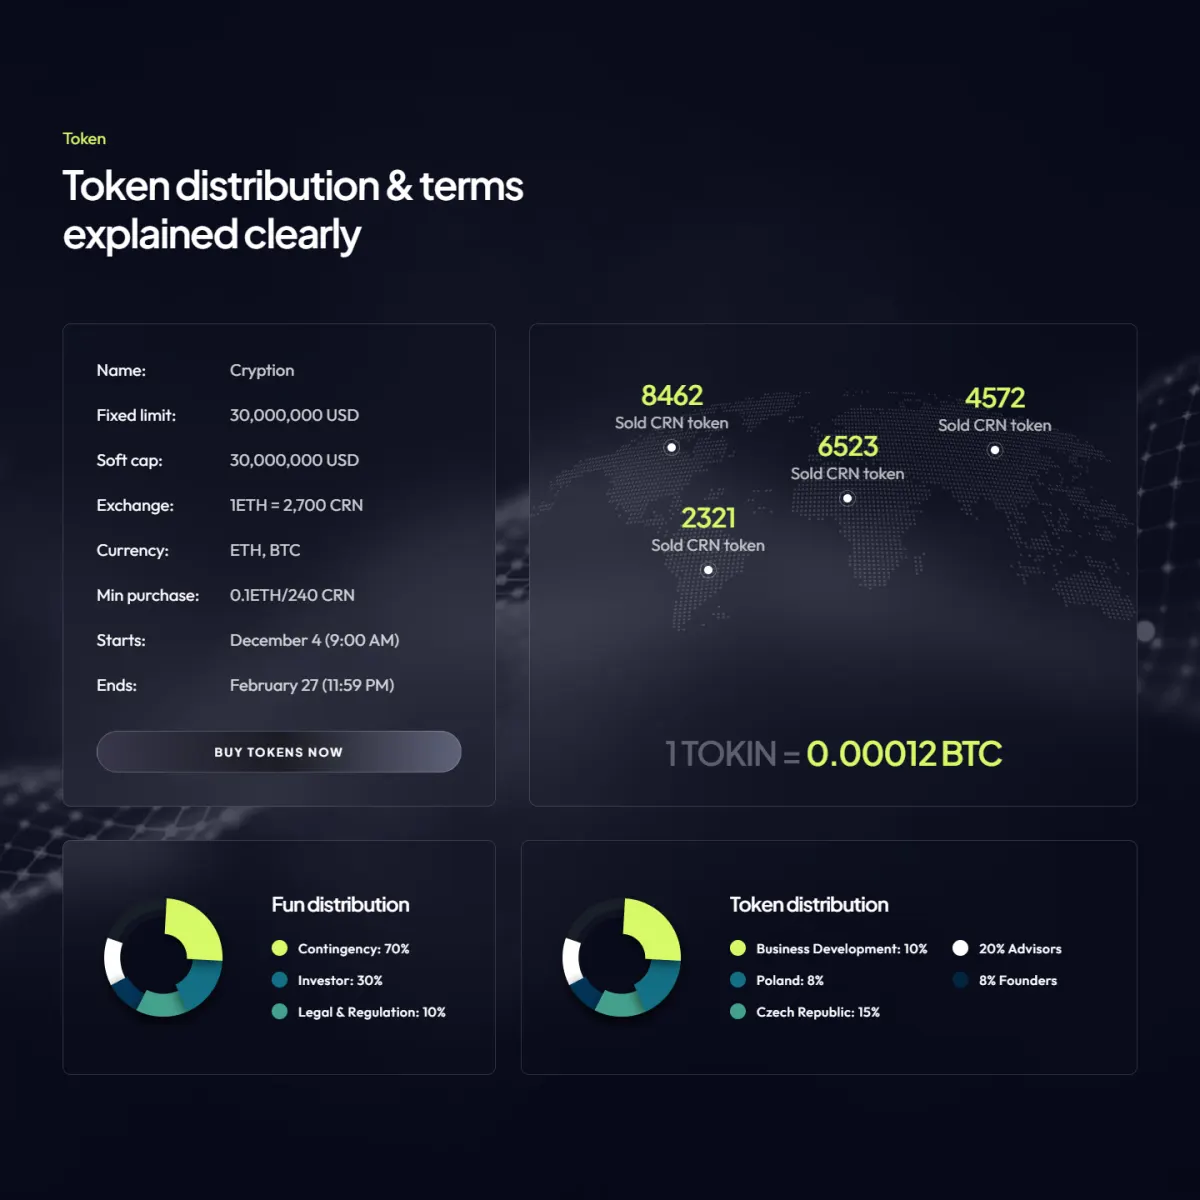
- Token Sale (Home Two) has the token terms table, the price line, map pins with sold amounts per region and two distribution charts.
- Chart draws doughnut charts with tabs for token and fund distribution. Each slice has a label, value and color.
- Roadmap lists your milestones by date in a slider.
- Coin Ticker scrolls coin names, prices and daily change across the page.
- Documents and Apps Download link your whitepaper and apps.
WooCommerce
Xeco styles the shop, product pages, cart, checkout and My Account in its dark design. Add products in Products › Add New; set payments in WooCommerce › Settings › Payments.
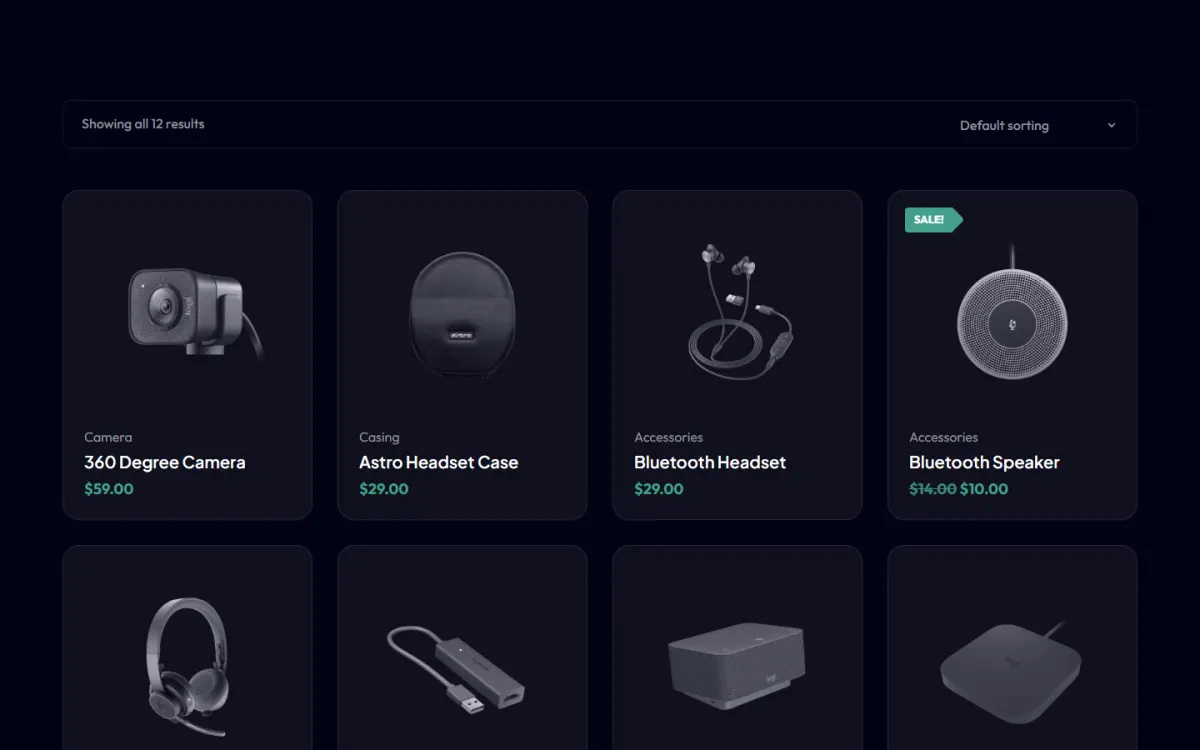
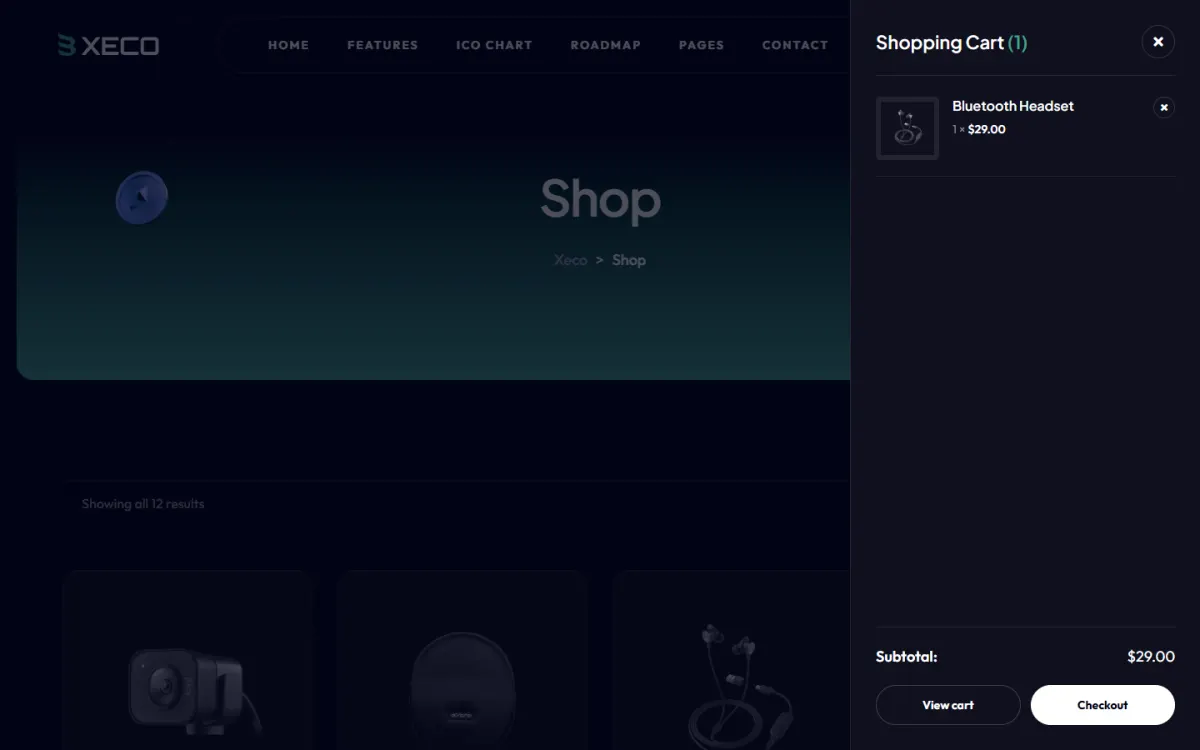
- Side mini cart: opens when a product is added and from the Header Cart widget.
- Shop header: the demos show a header with a cart button on all WooCommerce pages, using the "All WooCommerce Pages" display rule.
- Cart and checkout: both the classic pages (shortcodes, used by the demos) and WooCommerce's block pages are styled.
Wishlist & Quick View
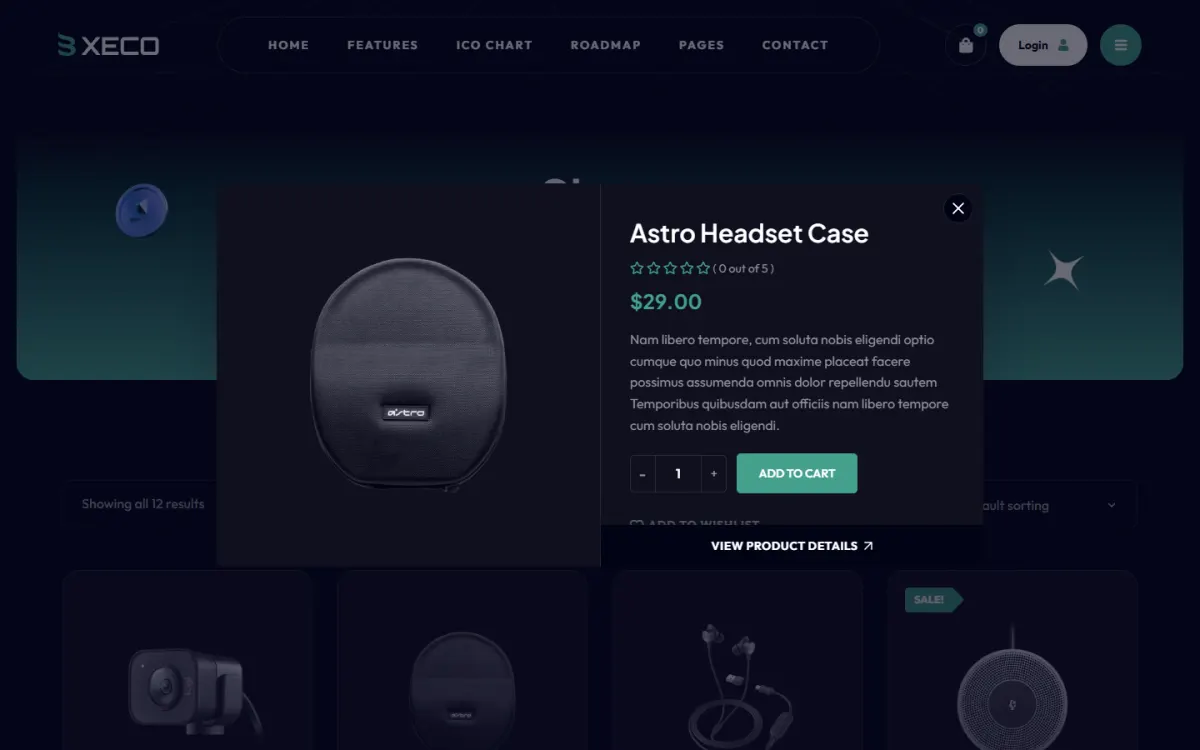
Both are built into Xeco Core. Switch them on or off in Customize › Xeco Customizer › WooCommerce Setting.
- Wishlist: the heart on each product card saves it. The Wishlist page lists saved products with add to cart, and logged-in customers get a Wishlist tab in My Account. Guests' lists are kept in their browser.
- Quick view: the eye button opens a 920 × 460 popup with the product image, gallery, price and add to cart.
Contact Forms
Forms use Contact Form 7. The demo imports the contact, newsletter and token order forms. Add a form to a page with the Contact Form widget and pick it by name.
- Each form sends from your own domain, so emails don't land in spam.
- Errors show as small tooltips under each field, and every email has a clean template.
- The footer newsletter is a Contact Form 7 form too; no Mailchimp plugin is needed. Send its emails to your newsletter tool or collect them from your inbox.
Sidebar Widgets
The blog sidebar is filled during the demo import. Change it in Appearance › Widgets. Xeco Core adds two widgets: Xeco Sidebar Posts (latest posts with thumbnails) and Xeco Info.
Editing Pages
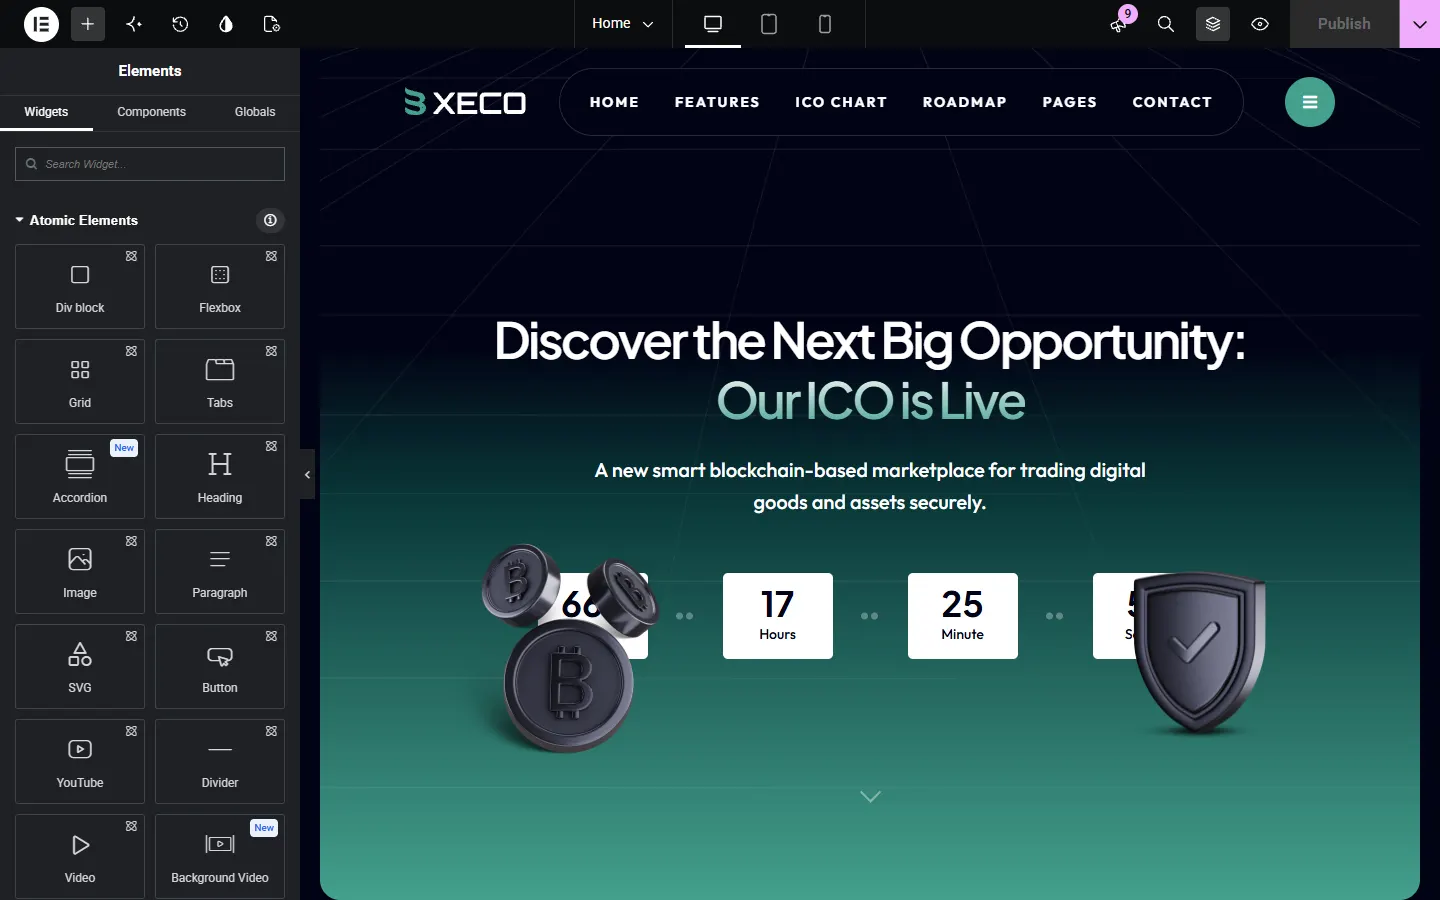
Open a page and click Edit with Elementor. The demos are built from Elementor containers (section › row › column) and small widgets, so you can click any title, button, image or column and change it on the left.
Entrance animation
Every widget and container has Advanced › Entrance Animation: fade in up, left or right with a delay as it scrolls into view. It doesn't run on phones or for visitors who turn off motion.
Style Two
Heading, Button, Banner Content, Progress Bar, FAQ, Team, Brand, Icon List, Chart and Divider have a second design, used by Home Two. Pick it in the widget's Style option.
Xeco Widgets
Find them in the Elementor panel under Xeco. Turn off the ones you don't use in Xeco Core › Widgets: their PHP, CSS and JavaScript stop loading.
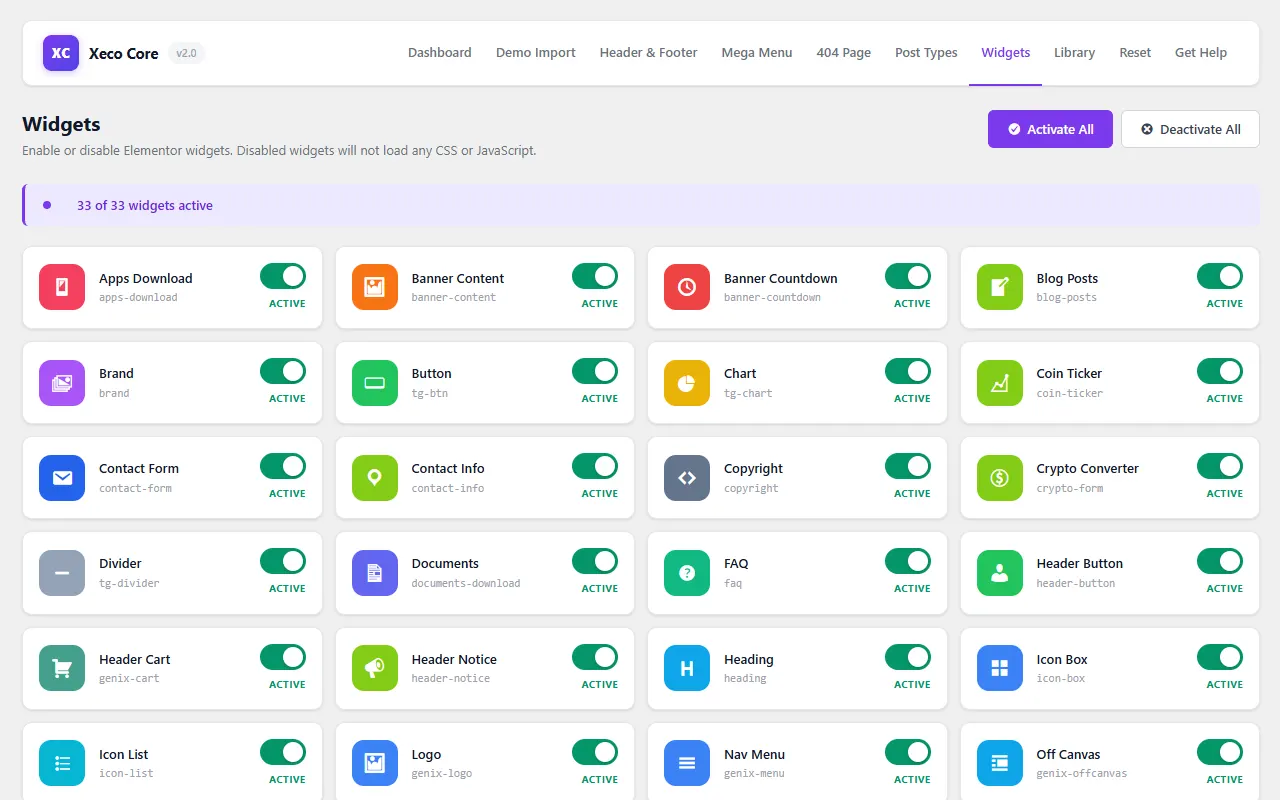
| Group | Widgets |
|---|---|
| Crypto & token | Crypto Converter, Coin Ticker, Token Sale, Banner Countdown, Progress Bar, Chart, Roadmap, Product Circle, Documents, Apps Download |
| Page sections | Banner Content, Heading, Button, Icon Box, Icon List, Service Card, Work Step, FAQ, Team, Brand, Latest Posts, Contact Form, Contact Info, Divider, Scroll Down |
| Header & footer | Logo, Nav Menu, Off Canvas, Header Button, Header Cart, Header Notice, Social List, Copyright |
Template Library

- Open itIn the Elementor editor, click the Xeco Templates button in the add-section area at the bottom of the page.
- BrowseSwitch between Blocks (29) and Pages (2), filter by category (Header, Hero, Token Sale, Roadmap, FAQ, Footer…) or search.
- PreviewClick the eye to see the real section, with sliders running.
- InsertClick Insert. Images are copied to your Media Library once and reused next time; links point to your own pages.
Sites in Arabic (or another right-to-left language) get the Arabic library automatically.
RTL & Arabic
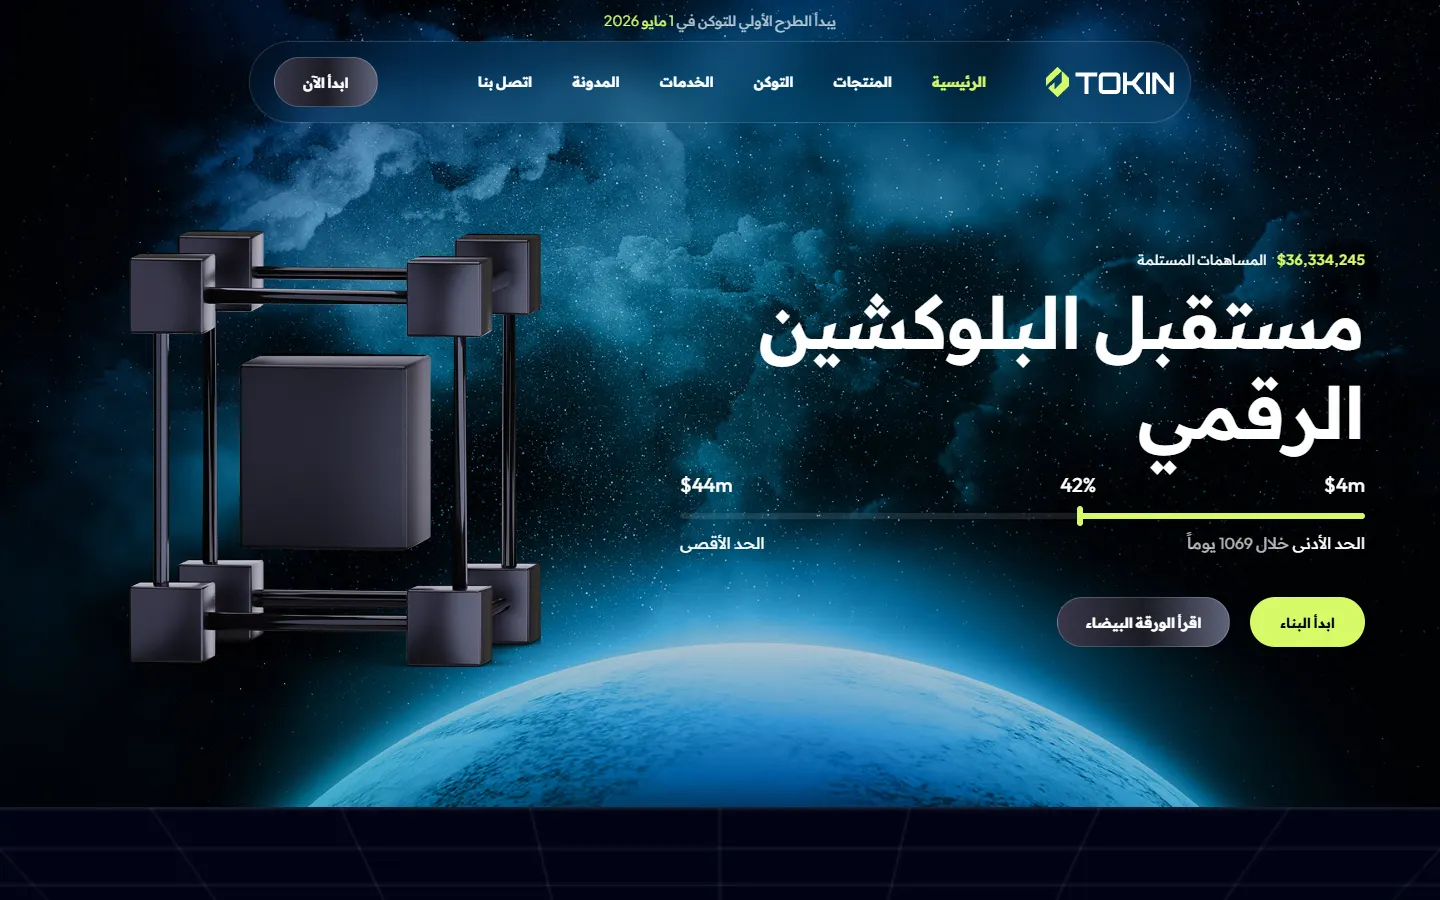
- Set the languageGo to Settings › General and choose العربية (or another RTL language) as Site Language.
- Import the Arabic demoIn Xeco Core › Demo Import the Arabic tab opens by itself. Import Home One or Home Two.
Every stylesheet has a right-to-left copy; sliders, arrows and icons follow the direction, and Arabic text uses the Readex Pro font (it loads only when Arabic text is on the page). Xeco and the visitor texts of Xeco Core are translated into Arabic.
Translation & WPML
Translate the theme
Install the free Loco Translate plugin, go to Loco Translate › Themes › Xeco and add your language. Do the same for Xeco Core under Plugins. Shop texts use WooCommerce's own translations.
Multilingual sites
With WPML or Polylang, translate headers, footers, mega menus, 404 pages and forms like any page; visitors see the copy in their language. Customizer texts and Xeco widget texts can be translated too.
Multisite
Xeco works on a WordPress network. Network-activate Xeco Core or activate it per site; each site keeps its own settings and can import its own demo, so you can run English and Arabic sites side by side.
Updating Xeco
Update the theme
Download the new package, then go to Appearance › Themes › Add Theme › Upload Theme, upload xeco.zip and click Replace current with uploaded. Your settings and pages stay.
Update Xeco Core
When a new version is out, WordPress shows the update in Dashboard › Updates like any plugin.
Coming from Xeco 1.x
Update the theme and Xeco Core, and Xeco moves your data over by itself on the first page load after the update:
- Header Footer Elementor templates become Xeco headers and footers, with their display rules.
- A header made with the old Customizer header settings is created if you had none.
- WPC Smart Wishlist lists move to the built-in wishlist.
- Customizer settings and custom fields keep working, then the plugins Xeco no longer needs are switched off with a notice.
Make a backup before any major update. Most hosts offer one-click backups.
Reset the Site
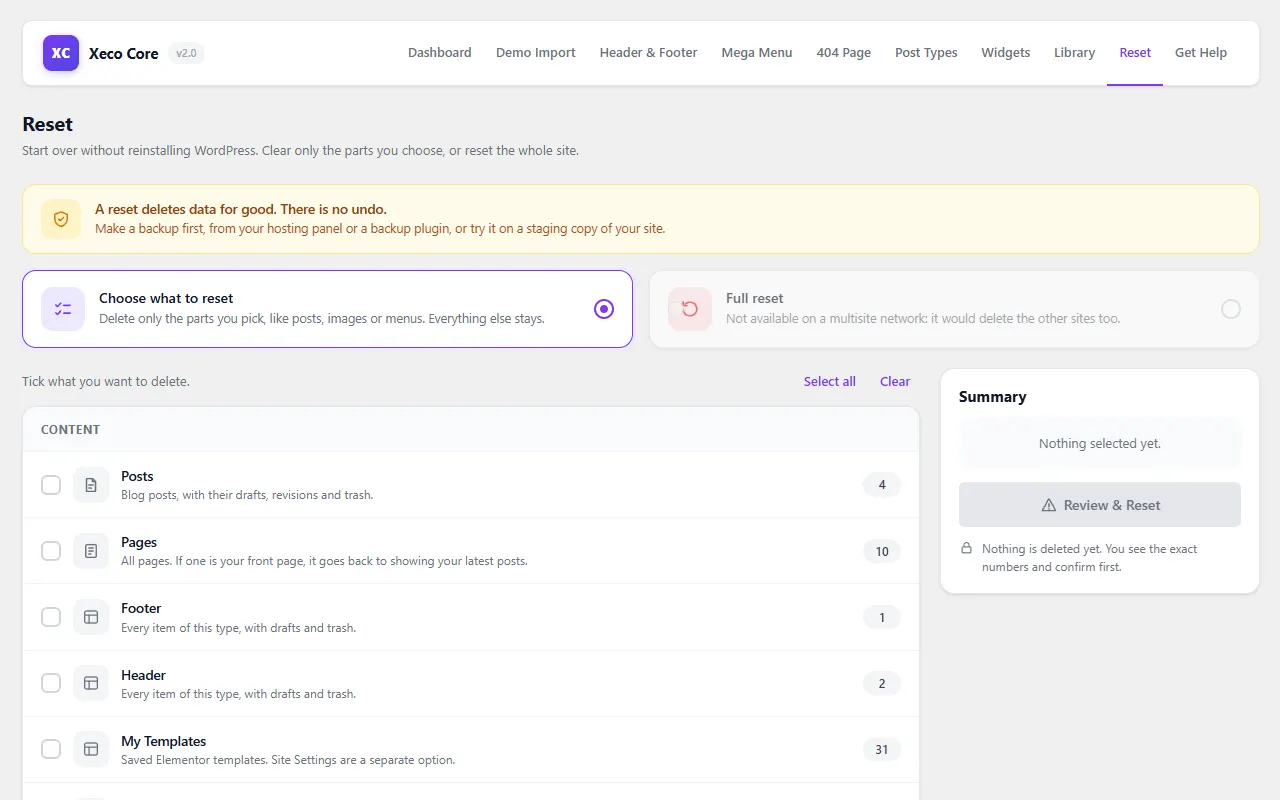
Reset only what you choose
In Xeco Core › Reset tick what to delete: any post type (with or without its images), the Media Library, menus, categories and tags, comments, widgets, Customizer settings, Elementor Site Settings, Xeco Core settings, other users or cached data. Images still used elsewhere are kept.
Full reset
Returns the site to a fresh WordPress, like a new install. You stay logged in, and the site title, address, language, permalinks, theme and plugins are kept. It's not available on multisite.
How it works
- Review & Reset first counts exactly what will be deleted. Nothing is deleted yet.
- Confirm you have a backup and type
reset. - A progress ring shows each step. If the run stops, the page offers Continue.
A reset can't be undone. Make a backup first.
Speed Tips
Xeco loads fonts from your server and each widget's CSS and JavaScript only on pages that use it. To go further:
- Turn off the widgets you don't use in Xeco Core › Widgets.
- Use a caching plugin (LiteSpeed Cache, WP Rocket, W3 Total Cache) or your host's cache.
- Upload images at the size they're shown, in WebP when possible.
- In Elementor › Settings › Performance, keep the optimized loading options on.
Troubleshooting
The import stops or images are missing
Check the System Status tile on the Demo Import page and fix any red or yellow rows (usually memory or time limits). Then run the import again; it only adds what's missing.
The prices in the converter don't change
Check that Live Prices is on and the coin's CoinGecko ID is right (the last part of its coingecko.com link). Prices refresh at most every 10 minutes. Your server must be allowed to connect to api.coingecko.com.
The Buy Token form opens empty
The converter's Send Amounts must be on, its button must link to the Buy Token page, and the form fields must be named pay_amount, pay_currency, get_amount and get_currency with default:get.
Pages show "404 Not Found"
Go to Settings › Permalinks and click Save Changes once.
My changes don't show on the site
Clear your caching plugin's cache, then in Elementor › Tools click Regenerate Files & Data.
Form emails don't arrive
Many hosts block PHP mail. Install an SMTP plugin such as WP Mail SMTP and connect it to your email provider.
The Elementor editor won't load
Raise the PHP memory limit to 256M (see Raising PHP limits) and turn off other plugins one by one to find a conflict.
Support
Can't find the answer here? We're happy to help with questions, bugs and installation.
| Where you bought | How to reach us |
|---|---|
| ThemeGenix | themegenix.com/contact, with 12 months of priority support. |
| ThemeForest | The Support tab of the Xeco item page, with 6 months of support (can be extended on ThemeForest). |
To help us help you faster, include your site address, what you did, what you expected, and a screenshot. Your WordPress and PHP versions are in Tools › Site Health › Info.
Support covers using the theme and fixing bugs. Need custom design or development work? Our team is available for hire; ask us on the same page.
Still need help?
Send us a message and our team will get back to you.
Changelog
Version 2.0
November 2026- AddedHome Two demo with its own colors and logo, and Arabic demos of Home One and Home Two.
- AddedCrypto Converter with per-currency prices and icons, live CoinGecko prices and a Buy button that sends the amounts.
- AddedBuy Token page with an order form that fills in the amounts and emails both sides.
- AddedNew widgets: Service Card, Work Step, Token Sale, Crypto Converter, Coin Ticker, Product Circle, Latest Posts, Header Notice and Contact Form; Style Two for 10 widgets.
- AddedHeader & footer builder, mega menus, 404 builder, demo import, template library and Reset page in Xeco Core.
- AddedBuilt-in wishlist (with a My Account tab), quick view and side mini cart.
- AddedElementor Site Settings control the theme's colors and fonts on every page.
- AddedRTL, Arabic translations, WPML, Polylang and multisite support.
- AddedFull-screen login and register pages, footer newsletter with Contact Form 7, entrance animations.
- ImprovedLocal fonts, scripts that load only where used, accessibility and SEO (one H1 per page).
- ImprovedDark styles for classic and block cart and checkout; the demo import uses the classic pages.
- UpdatedKirki, ACF, Header Footer Elementor, One Click Demo Import, WPC wishlist and quick view and Mailchimp for WP are no longer needed; your data moves over on update.
Version 1.0
05 August 2023- AddedInitial release.
Credits
Xeco is built with these great open-source projects:
| Project | License |
|---|---|
| Elementor | GPL |
| Underscores | GPLv2 or later |
| Bootstrap 5 | MIT |
| Font Awesome Free | Icons CC BY 4.0, fonts SIL OFL 1.1, code MIT |
| Slick 1.8.1 | MIT |
| Chart.js 4 | MIT |
| Outfit, Plus Jakarta Sans and Readex Pro (Google Fonts) | SIL OFL 1.1 |
| rtlcss | MIT |
| Live prices by CoinGecko | CoinGecko API terms |